Sherbet Plus Throw and Baby Quilts
Wednesday, March 27, 2024
Happy Wednesday! I have two special quilt finishes to share today!! I actually finished these quilts last year, right before baby girl arrived. I made us matching quilts! A throw quilt for me and a baby quilt for her.
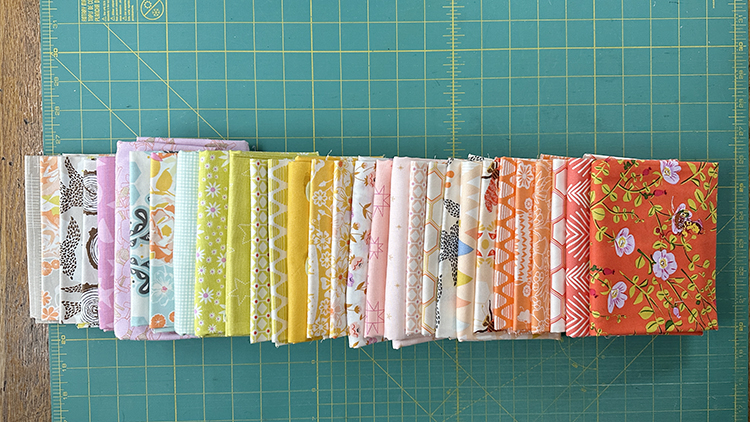
For these quilts I went with a sherbet rainbow color palette. It was built around a collection I've had in my stash for around ten years, Sweet as Honey by Bonnie Christine*. By now I didn't have all the prints anymore, so I supplemented with other prints from my stash. I love where the pull ended up!
Knowing I was going to make two quilts, I cut a ton of squares! As it turned out, I cut so many squares, I had enough to make a tote bag too, which I shared last year here: Patchwork Workshop Tote. I used my Workshop Tote Pattern and made the patchwork version.
First up, the throw quilt! This is the throw size from my Arithmetic Quilt Pattern using 4.5" squares.
Here it is in all its glory! In these photos the red-orange fabrics really stand out, but in person the contrast is more subtle.
I am so in love with the quilting on this one. It was quilted by Katie of Autumn Moon Quilting and I chose the "Posy Patch" design. It's so fun and retro!! I actually am having another quilt quilted in this design right now.
I dug into my hoard of Erin McMorris backings and decided on this print from her Weekends* collection. I worked on this quilt in my final months of pregnancy, otherwise I would have taken the time to pattern match the backing. It was a miracle I got it completed considering!
Went for a monochrome look for the binding, using the same print as the backing. I used one of my custom woven labels to finish it off.
And now the baby quilt! This is the baby quilt size from my Arithmetic Quilt Pattern using 4.5" squares.
This is the only quilt I made from start to finish specifically for baby girl. Of course there are tons of other quilts that we use with her, but this one is truly hers. I take her monthly photos on this quilt!
Confession time, the quilting on this quilt is rough. I really should have sent it along with the throw to be longarmed! When I basted this I was less than a month from giving birth. For some reason I thought I could do it on the floor. It was so difficult, I did not do a good job! Of course as soon as I was done I remembered I could have basted it on our dining room table. Because my basting job was so bad, the quilting is not great. But, it's okay. It's still a beautiful quilt and I've let it go.
I didn't have enough of the same backing I used for the throw quilt, so I chose another print from Weekends by Erin McMorris*.
Again, another nod to the throw quilt was binding the quilt in the same fabric as the backing. This is actually highly convenient and I'll be doing it again for sure. For both quilts I cut the binding strips from the excess backing that I cut off!
I used one of my custom woven labels to finish it off.
Despite a few imperfections, I love how these quilts turned out. It was fun to make matching quilts, I think it's something I'll do more of in future!
I'm thinking about hosting a little plus quilt sew along later this Spring, stay tuned for more info on that!!
Sherbet Plus Quilt
Pattern: Arithmetic Quilt Pattern
Fabric: Sweet as Honey by Bonnie Christine*, Weekends by Erin McMorris* and other stash.
Happy Quilting!
Wednesday, March 20, 2024
Happy Wednesday! I have a newly finished quilt to share today!
Immediately after I finished my soft and subtle vintage sheet plus quilt I started this quilt! I knew I wanted to make another quilt using all low contrast (low volume) vintage sheets. I decided to make another baby quilt since they're quick!
For this quilt, I turned to star blocks. I don't know what it is about star blocks and vintage sheets, but they just go together so well! I've made a lot of star quilts with sheets over the years, here are a few: Giant Vintage Star Quilts and Pillows, Pastel Pozy Quilt, Sparkling Cider Quilt.
To see the many projects I've made with vintage sheets, check out this post: Projects Made with Vintage Sheets
Compared to my last soft and subtle quilt, I used a few busier prints for this quilt. I'm not sure I like the selection quite as well, but it does still have a similar effect! The star blocks are 10" finished and the quilt finishes at 30"x40".
For the quilting, I decided on just shadowing the diagonal star point seams. Nothing too complicated!
The backing is a sheet I used on the quilt top. This one isn't a particular favorite, but I have a lot of it. I thrifted it here in Connecticut. I believe I found four of the same flat sheet at one thrift store, so someone must have really been cleaning out their linen closet!
I tend to choose mostly stripes when binding vintage sheet quilts, so I thought I would mix it up for this one. I went with this blue floral that didn't make the cut for the quilt top. I think it goes nicely with the backing. I used one of my custom woven labels to finish it off.
I am on a vintage sheet roll, I already have another quilt top finished! This one is a throw size. I'm trying to decide what soft and subtle quilt to make next. I either want to make a throw size plus quilt, or make another baby quilt and turn this into a proper series of quilts. We'll see!
Soft and Subtle Vintage Sheet Star Quilt
Pattern: 10" finished star quilt blocks
Fabrics: Vintage Reclaimed Bedsheets
Happy Quilting!
Thursday, March 14, 2024
Happy Thursday! I was actually planning on another adventures in thrifting post for this week, but I had a once in a lifetime find this weekend that deserves a post of it's own!!
On Saturday I was on my way to the library and decided to make a quick stop at our local Goodwill. I checked out my go-to sections: glassware, art supplies, linens, kids clothes. As I was about to leave I decided to walk past the electronics. I spotted the case and knew right away what should be inside, but I couldn’t imagine it really would be…
To my surprise a vintage Singer Featherweight 221K machine was inside and the price tag said $24.99. I don’t really remember walking to the register, but I was trying hard just to hold it together! It wasn’t until I got to the car that I let myself freak out properly!!
According to the paperwork in the case, it seems to have been serviced last in 2015.
It's in beautiful shape! A few nicks to the paint here and there, but they've been touched up.
This machine was manufactured in Kilbowie, Scotland in either 1968 or 1969.
I was prepared to give it a full cleaning before oiling, but I don't think it's been sewn on since it was serviced last. Not a bit of dust or loose threads! It definitely needed oil though, so I gave it a healthy dose of that.
I got sewing on it right away! I'm working on a new vintage sheet quilt using my Side Braid Quilt Pattern. It stitches great! The stitch regulator level was a bit tight, so I took off the stitch length plate to be able to oil a few spots, which helped. I know stitching on it will help loosen things up a bit too. It's stiff from what seems to be many years of sitting unused.
Obviously I'm going to need to make a tote for it! Good thing I have a pattern for that!! I'll be using my Sew Portable Travel Set Pattern, I just need to decide on the fabrics.
I still can't believe that I found one of these machines at a thrift store. One can only dream of a find like this!! I'll be dining out on this find/story for the rest of my life!
Happy Thrifting!
Wednesday, March 6, 2024
Happy Wednesday! I wanted to share a few drawstring bags I've made recently.
First up, my favorite of the bunch! I realized I have made very few bags from vintage sheets, so I wanted to change that! This is the project size from the lined drawstring bag pattern. I think I get the most use out of this size, I make it a lot!
I love this big floral sheet, and it felt right for the exterior main! Figured you can never go wrong with a good gingham, so I pulled a yellow one for the accent.
I really wanted to use a striped sheet for the ties, but I didn't have a long enough piece of the one that matched. So twill tape to the rescue! Thankfully the antique ruler twill seems to go with everything.
This ended up being one of my favorite bags I've ever made! Which is saying something, because I've made a lot of these bags!! I can't wait to make more of them with my sheet stash.
I was in the mood to make something heart related around Valentine's Day, and this is what I came up with! I stuck a heart block in the middle of an everything size drawstring bag (free tutorial size). I used Allison Harris' heart block tutorial, and made a block that finished 6". I centered it in the exterior main, you can find measurements to do the same by using my patchwork star lined drawstring bag tutorial.
This bag is a real melting pot of fabrics! The background is new to my stash, Morris & Co for Freespirit. The peach heart fabric is thrifted. And the lining is Carolyn Friedlander, and it's been in my stash for years.
I didn't have the right color red for the ties, so I ended up dyeing some twill tape. It turned out slightly more blue-ish red than I wanted, but that's okay! I think it still works. Added some 1" beehive beads to this one.
I kept the back of the bag plain, which really shows off the main print!
Last but not least, a quick make to gift a small quilt! This puffin fabric was a gift from my friend Jacey, and it felt good to use some of it for this bag! The recipient was a toddler, and I thought they would appreciate this fabric! I paired it with a print from Geometric Bliss. Went with paracord for the ties on this one.
Always fun to pull fabric combinations for these bags. I'm still not tired of making them!
Happy Sewing!
Subscribe to:
Posts
(
Atom
)