Happy Halloween!
Monday, October 29, 2018
Happy Monday! Guess what? I've added two new sizes to last year's Enamel Pin Banner Tutorial! The original size is now the Large, and I've added a Medium and a Small option! You can find the updated tutorial here: DIY Enamel Pin Banner
Want to see the new banners I've made? Keep reading!
After we moved, I couldn't find my original banner, so I made a new one! Actually I thought I'd given the original away, so I stopped looking pretty quickly. These whip up so quick, so in an afternoon I had a new one to fill. For this banner I used a nice gray Essex Linen and paired it with a fun minty pom-pom trim from my stash. I've added a bunch more pins to my collection, and I've listed as many as I can down below!
Bear Paw Pin by Patchwork Threads, You Seem Cool Pin by The Little Friends of Printmaking, Leslie Knope Pin by Sweet and Lovely, Puffin Pin by Boy Girl Party, Bowtie Cat Pin by Boy Girl Party, Corgi Pin by Boy Girl Party, Hylian Sheild Pin by The Wooden Pin, No Regrets Pin by Colette Patterns, Hogwarts Castle Pin by Sore Winners, Singer Featherweight 221 Pin by The Singer Featherweight Shop, Vintage Sewing Machine Pin by Maker Valley, Bunny Knit Pin by Crafted Moon, Blerg Pin by Sweet and Lovely, Kawaii Bee, Mushroom, and Flower Pins by Em and Sprout.
Next up, a medium sized on for my Stitch pins! As you can see I have quite a few of these and I was thinking they'd look better on their own banner. So I chose details that I thought matched well with the movie (Lilo & Stitch). I used a print from Carolyn Friedlander's Euclid collection, plus some pom-pom trim and a couple wooden beads. I love how this one turned out, it makes me smile every time I see it.
These are all from Disney, purchased in the parks over the years!
Finally, a small banner! I recently picked up these spooky pins from Em and Sprout on Etsy, and they seemed like they needed their own banner! Plus a button I thrifted years ago. I used cotton chambray dots in black from Robert Kaufman, which is a real favorite. I liked that it felt Halloween-ish but is still a neutral that will look good with other pins if I want to switch it up!
Halloween Pins and Kawaii Baby Demogorgan by Em and Sprout.
Once I uncovered the first pin banner I made (seen above!), I wasn't sure what to do with it. Then I remembered my huge stash of buttons! I had more than enough to fill it up. I could probably fill up another one to be honest!
No links for these ones, apologies. I bought all of these in person or was given them at events or by friends. I did buy quite a few at Anthology in downtown Madison, a shop I really miss. If you're in Madison make sure and stop in for some great gifts (and a few goodies for yourself!).
Speaking of gifts, these would be perfect to make and give alongside some cute pins! Find the full tutorial here: Enamel Pin Banner Tutorial.
Happy Sewing!
Tuesday, October 23, 2018
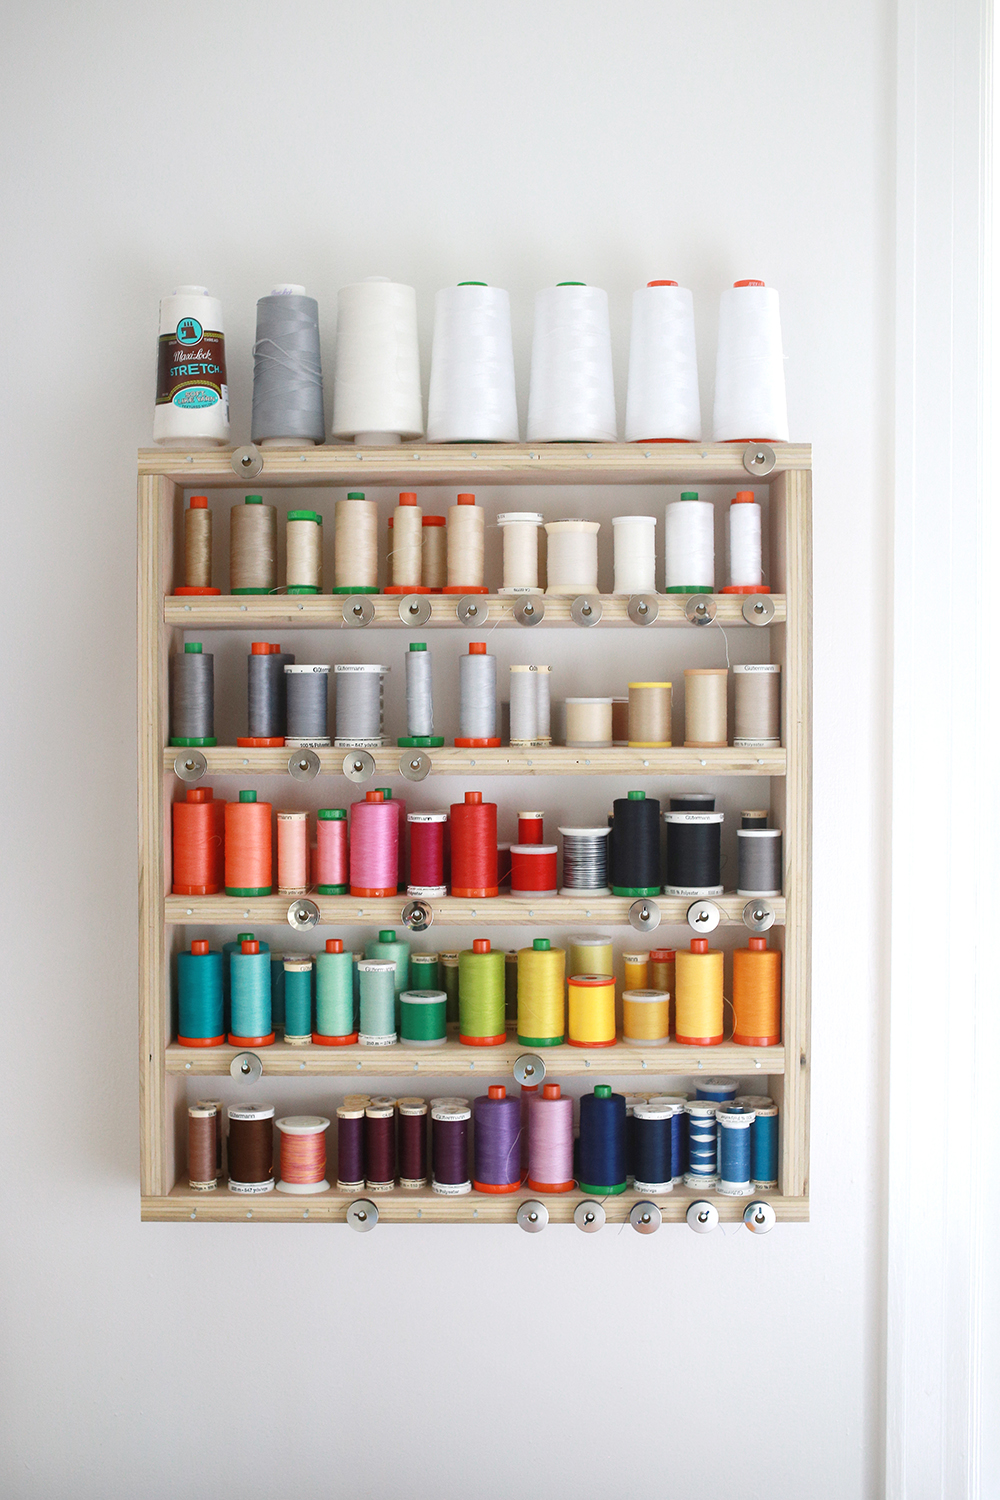
Happy Tuesday! Today I wanted to share a recent project that I finished for my sewing room, a thread storage shelf! In years past, I've used a small thread rack to store some of my threads, but never had enough room for them all. I knew I wanted to make something customized to my needs and thread collection, so I set about coming up with a simple solution.
Looking for more sewing room posts? Check out my new series: Sewing Room Organization Series
I was inspired by this shelf my friend Christina made for her longarm thread storage. I knew I wanted my shelf to be a simple design like hers, and that it needed to solve a few problems for me. It needed to be slim enough that it fit beside my machine, for easy access. It needed to easily store small spools and have room for cones. And finally, it needed to have bobbin storage. I really wanted to be able to store the bobbins right with their coordinating thread.
I managed to use plywood that I had leftover from a previous project, but you could definitely make one of these from sized lumber (like 1x4s or 1x3s) from your local home improvement store. I cut my plywood down into strips that were 3" wide. For my space this was as wide as I could go without inching too far into my sewing machine space, but you could use something wider or skinnier to work in your space. Here are a few quick measurements if you're thinking about making a shelf too:
Final Measurements: approx. 18" wide x 20.75" tall
(4) shelf pieces 16.5" long
(2) side pieces 19.25" long
(2) top/bottom pieces 18" long*
*I highly recommend waiting to cut these until the very end if you can, that way if your other measurements are off at all, you can cut these to fit!
I put my shelf together with a little wood glue and some 1.5" long screws. My plywood was .75" thick. The interior shelves are spaced approx. 3.25" apart, which easily fits the taller Aurifil thread spools. To finish it off I evenly spaced little 1"picture hanging nails along the shelf edges to hold bobbins. This is my favorite feature for sure! I had seen this done on a few other shelves like this one.
I'm so happy with how this turned out! Not only is it super useful to have all my thread stored within reach, it's such a pretty and cheerful piece in my sewing room. I can see right away what colors I have, and don't have to spend time digging through my bin of thread to find what I need. Yay for practical projects!
I hope you've enjoyed this tutorial! I have lots of other tutorials for everything from quilts, pillows, bags, and holiday items to informational series and techniques. Find all my tutorials here: Tutorials. My online shop is filled with patterns for quilts and bags. Find my patterns here: Jeni Baker Patterns
If you make something using one of my tutorials or patterns, I hope you'll tag me @jenib320 and use my hashtag #jenibaker on instagram!
Happy Making!
Monday, October 1, 2018
Happy October! It's time for September's monthly report. See past reports here.
Above: Wonderland Log Cabin Quilt
I started a few new projects this month, and crossed some off my list too. I think overall it was a good balance of finishing and starting. One of the projects I have been meaning to start for months, is another monochromatic quilt. I'm making the Subtle quilt from my friend Amanda-Jean's book, No Scrap Left Behind. It's going to be my first leaders and enders project. I've always wanted to try making a quilt in this way.
Speaking of trying new things, I'm really diving into a new technique with my double gauze plus quilt. I'm hand quilting it! I never thought I had the patience for something like this, but so far so good. I've just started, so we'll see how I end up liking it in the long run. For now, it's fun!
I also finally indulged in making Christmas decorations. Now that we are in a house, I can have a full sized tree and I have a place to hang stockings! My first project is a tree skirt. I've been wanting to make my friend Christina's tree skirt pattern since she first made hers years ago. I actually have the top completed, but here is a photo of the tree blocks. I am loving how this project is turning out!
Why not sew for multiple holidays at the same time? I cut into some Halloween fabric (Boo by Cotton & Steel) for a new project bag. This is the project size from the lined drawstring bag pattern.
To keep myself accountable for my stash goals, I'm tracking my yardage for fabric and yarn each month. Read more about how I track my here. Here is how I did in September:
September Fabric
Used up: 21.5 yards
Brought in: 4 yards
Net: -17.5 yards
Year to date: -14 yards
September Yarn
Used up: 0 yards
Brought in: 0 yards
Net: 0 yards
Year to date: +218 yards
I'm in the negative! FINALLY! This year has been tricky for me and my stash. I'm very happy to be down in fabric yardage for the year, thanks to a bunch of finishes this month. Plus, I only brought in four yards this month! Not going to lie, I was tempted to by fabric quite a few times this month, but stayed strong. Hoping to continue that trend through the end of the year.
Fresh off my wonderland quilt finish, I pulled out another super old work in progress, my Tula Pink kaleidoscope quilt. I've been making slow but steady progress over the last few months. Now I'm finally constructing blocks!
Early in the month, the high heat finally dissipated and we started back in on our yard. Our backyard especially had pretty much gone back to nature, so it's been a huge undertaking trying to get it back in shape. One of the projects we tackled was creating a little patio and pathway with all the stone pavers we had wrangled from all across the back and front yard. It was satisfying to work on a project that had instant gratification. Now it's time to tackle the grass!
George bun! He often likes to scrunch himself up into only half of his bed. Doesn't look super comfy, but that's his style.
Have a Great Month!
Labels:
Arithmetic Quilt Pattern
,
Bags
,
Bunny
,
Home
,
Lined Drawstring Bag Pattern
,
Monthly Report
,
Quilting
,
Sewing
Subscribe to:
Posts
(
Atom
)