Happy Halloween!
Monday, October 31, 2016
Happy Halloween! This year George bunny is... a magic eight ball! He is pretty sure that signs point to him getting a carrot. Which of course he did! :)
How about some outtakes?
Have a great day!
Thursday, October 27, 2016
I wanted to create a spot for sharing resources and supplies that are needed for my patterns and tutorials. You'll find sources for notions and fabrics, plus links to relevant tutorials. I'll keep this updated with current patterns and information.
Supplies
I recommend checking your local quilt shop and craft/art store first when sourcing materials. It's important that we support our local shops when we can so that they stick around. If you're having trouble finding something though, I've listed online sources that I've used.
Quilting Cotton Fabric
Used in: Nearly all of my quilting + sewing tutorials/patterns
Where to Buy: Local fabric store, Fat Quarter Shop, Stash Fabrics, The Intrepid Thread.
Home Dec/Canvas Fabric
Used in: The Elemental Tote Pattern, Triplizip Zipper Pouch Pattern, Canvas Lined Drawstring Bags, Wall Organizer Tutorial
Where to Buy: Local fabric store, Fabricworm, Miss Matatabi on Etsy, AL Francis Textiles on Etsy.
1/2" Twill Tape
Used in: Lined Drawstring Bag Pattern (and Tutorial), Lined Drawstring Bag Expansion Pattern, Sew Portable Travel Set Pattern
Where to Buy: Find it in my online shop.
550 Nylon Paracord
Used in: Lined Drawstring Bag Pattern (and Tutorial), Lined Drawstring Bag Expansion Pattern
Where to Buy: Find white and cream paracord in my online shop. Also shop Bored Paracord, JoAnn Fabrics, Walmart, or your local craft store.
Cork Fabric
Used in: Lined Drawstring Bag Pattern (and Tutorial), Lined Drawstring Bag Expansion Pattern
Where to Buy: Sew Sweetness, Sallie Tomato
Wooden Beads
Used in: Lined Drawstring Bag Pattern and (Tutorial), Lined Drawstring Bag Expansion Pattern
Where to Buy: Find them in multiple sizes in my online shop.
1" and 1 1/4" Cotton Webbing
Used in: The Elemental Tote Pattern, Sew Portable Travel Set Pattern
Where to Buy: Find both in my online shop.
7" & 10" Zippers
Used in: Triplizip Zipper Pouch Pattern, HST Zipper Pouch + Key FOB Tutorial
Where to Buy: Zipit on Etsy.
Laminated Cotton Fabric
Used in: The Elemental Tote Pattern, Triplizip Zipper Pouch Pattern
Where to Buy: Laminates on Etsy, Modes4u.com
Binder's Board
Used in: Sew Portable Travel Set Pattern
Where to Buy: Local art supply store, Amazon.
Flatter by Soak
Recommended for: Webbed Quilt Pattern, Patchwork Essentials: The Half-Square Triangle, Giant Vintage Star Tutorial.
Where to Buy: Soakwash.com, Soak local store locator, Amazon.
Foundation Paper
Recommended for: Rotary Cutter Block Tutorial, Coffin Block Tutorial, New York Beauty Block Tutorial
Where to Buy: Ctpub.com, Amazon.
Add a 1/4" Ruler
Recommended for: Rotary Cutter Block Tutorial, Coffin Block Tutorial, New York Beauty Block Tutorial
Where to Buy: CMdesignsonline.com, Amazon.
Quilt in a Day Triangle Square-up Ruler
Recommended for: Half-Square Triangle Sampler Pattern (and Tutorial), Fractal Quilt Pattern, Patchwork Essentials: The Half-Square Triangle, and all other half-square triangle tutorials.
Where to Buy: Quiltinaday.com, Amazon.
Crushed Walnut Shells (Lizard Litter)
Recommended for: Hexagon Ring Pincushion Tutorial, Triangular Log Cabin Pincushion Tutorial, Half-Square Triangle Pincushion Tutorial
Where to Buy: Local pet store, Amazon.
Hexagon Paper Pieces
Recommended for: Fabric Embellished Dish Towels, Hexagon Ring Pincushion Tutorial
Where to Buy: Paperpieces.com.
Resources
- Art of Choosing Series on fabric selection
- Chain Piecing Tutorial
- How to Put a Gusset in a Bag Tutorial
- Quilt Basting Tutorial
- Machine Quilt Binding Tutorial
- Half-Square Triangle Tutorial (traditional two-at-a-time method)
- Half-Square Triangle Tutorial (alternative four-at-a-time method)
Tuesday, October 25, 2016
Last month I had the chance to squeeze in one more day of fabric dyeing before the weather turned. I had a leftover indigo dye kit from our retreat, and wanted to use it up. I also had plans to do a mini-makeover on our bathroom. Blue is a calming color so it seemed like a good idea to use indigo in our tiny bathroom.
I planned to replace our shower curtain and also make a curtain to go around our sink. The sink curtain would provide some hidden storage and hide the plumbing. I looked around for tutorials for both a sink curtain and a shower curtain, but ended up winging it. I wanted something simple.
Knowing I wanted to make a shower curtain, I ordered some 108" wide Kona Cotton in white. In addition to the Kona, I also dyed a piece of Cambridge lawn in white, some cotton canvas, and a few other random pieces of regular width Kona white and an off-white solid in my stash.
For more information on indigo dyeing, check out my Indigo Dyeing Tutorial.
Here is what I dyed and I how resisted each piece of fabric:
Fabric was scrunched into big messy balls and then resisted with rubber bands. This is the piece I used for the shower curtain.
Fabric was scrunched into big messy balls and then resisted with rubber bands. This is the piece I used for the sink curtain.
Fabric was scrunched into big messy balls and then resisted with rubber bands. This is the cotton lawn piece.
Fabric was folded and secured with twine.
Accordion folded, secured with twine.
Accordion folded, secured with clothespins.
Loosely accordion folded, secured with rubber bands.
Fabric was twisted into a cone and then resisted with wrapped twine.
Fabric was scrunched into a ball and then wrapped in twine to secure.
For the shower curtain, I used the shower curtain we already had (a cheap one from Target), as a starting point. For the length, I started with the finished height of the curtain then I added 3" for a 1.5" top hem, and 6" for a 3" bottom hem. For the width, I started with the finished width and added 2" total for a .5" hem on either side. The top hem has twelve button holes for the curtain hooks.
For the sink curtain, I measured around my sink and the height from under the sink. For the width, I added 2" total for the .5" side hems, plus around 10" extra for gathering. For the height, I added around 1" for the velcro, and left plenty of extra length to do a test measure on the sink. I ended up with around a 2" hem. To attach the curtain to the underside of the sink I used home decor velcro. It's holding up okay, but I may need to reinforce it somehow, we'll see how it does over time!
At our retreat this summer I also dyed some flour-sack towels. I picked them up a few years ago for a project, but didn't end up using them. They've been collecting dust, and I thought it would be fun (and low risk) to dye them.
After dyeing, I sewed a little loop of twill tape to one corner of each towel to make them easy to hang from a hook in our bathroom.
I found this vintage metal shelf on Etsy. I spray painted it white and hung it above one of the towel racks. It doesn't add a ton of storage, but it adds some interest to the walls and has room to display some pretty things.
I'm happy with how the bathroom is coming along. Since we rent, we can't make any major changes, but it still feels nice to try to spruce things up a little. The small changes have been refreshing.
Friday, October 21, 2016
1. Untitled by Deb Volkman, 2. Fade to Black by Debbie, 3. Grandmother's Flower Garden by Edeltraud Ewert, 4. Fast & bright quilt by Lisa, 5. "Hayride" by Victoria Gertenbach, 6. FO: Brushstroke Plus by Jacey, 7. Another 'Spin' by Opal Cocke, 8. Thicket Quilt by Ursel Josefs-Kirschbaum, 9. EPP Pillow by Jayne
Periodically, I go through my favorite photos on Flickr, and choose nine sewing/quilting related projects to showcase here. These photos and projects are not my own, you can find the original images and creators by clicking the coordinating links! If for any reason you do not want your project featured here, please email me and I'll remove it!
Happy Weekend!
Wednesday, October 19, 2016
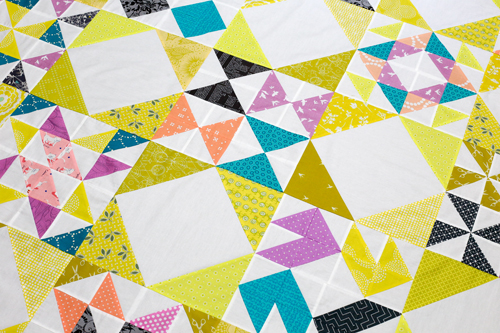
Happy Wednesday! I'm excited to bring you the final installment of a series of sampler quilt settings to accompany my book, Patchwork Essentials: The Half-Square Triangle. I wanted to share something that would be a good add-on to the 60 Block Chart included in the book! The blocks in that section can be used in many ways, including in the final chapter of quilts in the book. You can find the other setting tutorials here: Over and Above Quilt Setting Tutorial and Blockade Quilt Setting Tutorial.
Read more about the finished quilt here: Interlaced Quilt.
These quilt settings (layouts!) could be used with the block chart in my book, blocks from my Simply Sampled or Half-Square Triangle Sampler patterns, or any 12" finished quilt blocks! To make this quilt, you'll need 17 blocks. Below you'll find the instructions for the quilt setting only, not the blocks. There are fabric requirements to help guide you on making the half-square triangle blocks from the book needed for this setting.
Still need a copy of my book? Pick up a signed copy here: Patchwork Essentials: The Half-Square Triangle!
Sewing Level: Intermediate/Confident Beginner
Finished size: 60"x84"
Materials:
- (17) 12.5" unfinished quilt blocks
- 2 1/4 yards of accent fabric
- 2 1/4 yards of background fabric
- 5 1/4 yards of backing fabric
- 68" x 92" piece of batting
- 5/8 yard of binding
- Coordinating thread
Notes:
WOF = Width of Fabric (42")
Fat Quarter = 18" x 21"
Cutting:
From accent fabric:
- Cut (12) 6.5" x WOF strips
- From each strip, cut (6) 6.5" squares for a total of 72
From background fabric:
- Cut (6) 12.5" x WOF strips
- From each strip, cut (3) 12.5" squares for a total of 18
From binding fabric:
- Cut (8) 2.5" x WOF strips
---------------------------------------------------------------------------------------------------------------
To make 17 half-square triangle quilt blocks, you'll need:
2-at-a-time HST method | 4-at-a-time HST method | 8-at-a-time HST method | |
---|---|---|---|
Print fabric | 7 fat quarters | 8 fat quarters | 9 fat quarters |
Background fabric | 1 5/8 yds | 1 5/8 yds | 1 5/8 yds |
---------------------------------------------------------------------------------------------------------------
Instructions:
*Use a 1/4" seam allowance unless otherwise noted.*
1. On the wrong side of your 6.5” accent squares, draw a diagonal line from corner to corner using a marking pen. Place an accent square right sides together lined up with one corner of a background square and pin in place. Sew on top of the marked line. Backstitch to secure your stitching. Trim off corner, leaving a 1/4” seam. Press accent fabric up and away. Turn block clockwise and repeat for remaining corners. Corner pieces will overlap by 1/4”. Trim block to 12.5" if necessary.
Make a total of 18 square in square blocks.
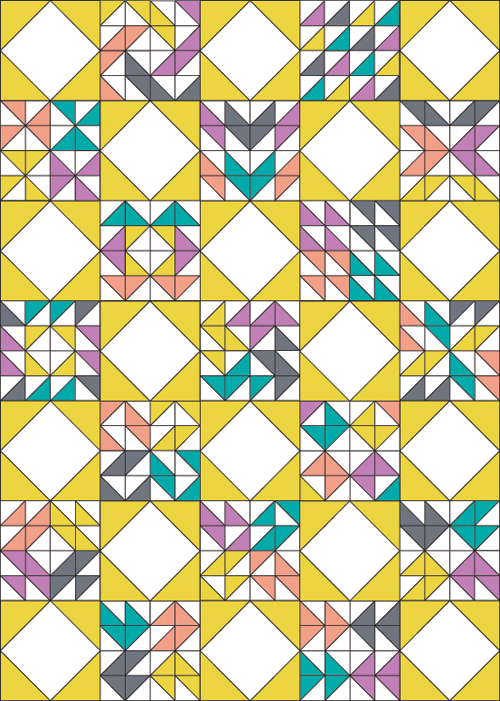
2. Arrange half-square triangle blocks and square in square blocks in 7 rows of 5 blocks each. Sew elements together in each row, press seams open. Sew blocks together in each row. Press seams in one direction, alternating direction every other row. Sew rows together. Press seams open.
3. Cut backing yardage in half. Press. Trim off the selvedges and sew your pieces together lengthwise. Press seam open.
4. Basting: Using masking or painter’s tape, tape the backing to a clean, hard surface, right side down. Spread out your batting on top of the backing. Smooth out any wrinkles. Carefully spread out your quilt top on top of the batting, right side up. Pin your top, I like to use curved safety pins, spacing the pins a few inches apart. Make sure that your pins are going through all three layers.
5. Quilting: Quilt as desired, by machine or by hand. Trim away excess batting and backing fabric.
6. Binding: Trim off selvedges and sew your binding strips together to form one long strip, press seams open. Fold in half lengthwise, pressing with your iron as you fold. Attach binding using your preferred method. For a detailed tutorial on attaching your binding to both sides by machine, see here.
I hope you've enjoyed this tutorial! I have lots of other tutorials for everything from quilts, pillows, bags, and holiday items to informational series and techniques. Find all my tutorials here: Tutorials. My online shop is filled with patterns for quilts and bags. Find my patterns here: Jeni Baker Patterns
If you make something using one of my tutorials or patterns, I hope you'll tag me @jenib320 and use my hashtag #jenibaker on instagram!
Check out the other free quilt setting tutorials in this series:
Over and Above Quilt Setting Tutorial
Blockade Quilt Setting Tutorial
Happy Quilting!
Subscribe to:
Posts
(
Atom
)