Pages

Wednesday, August 31, 2016

Nani Iro Dreams Quilt + Tips For Quilting with Double Gauze

Nani Iro Dreams Quilt - In Color Order
Happy Wednesday! If you've been reading my blog or have known me for just about any amount of time, you'll know I have a lot of favorites. Each new quilt I finish usually ends up as my favorite. I have favorite quilt backings (mostly vintage sheets), lots of favorite shows, foods, fabrics, etc. With that being said, this is my favorite thing that I have ever made, and I am not sure what will or could beat it at the moment.

My friends, meet my Nani Iro Dreams Quilt.

Nani Iro Dreams Quilt - In Color Order
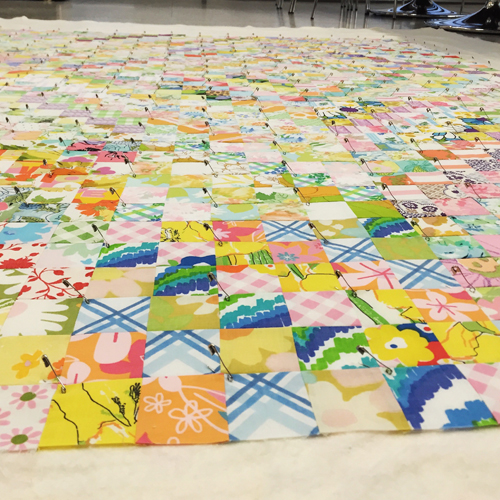
I've been collecting double gauze for a while now, specifically Nani Iro double gauze designed by Naomi Ito for Kokka. I snatched up yardage of most of the many prints that my local shop carried over the years, vacation shopped for double gauze and splurged online a number of times to build my stash. The biggest addition was a bundle I bought at last year's Fall Quilt Market and split with Jacey. This past Spring I knew it was time to make a double gauze quilt. I've worked with double gauze for a few garments, but never for a quilt.

Nani Iro Dreams Quilt - In Color Order
I wanted the fabrics to be the star of the show, so I chose to make very simple nine-patch blocks. My square size was determined by the bundle, I chose the largest square size I could with very little waste. I used nearly all the prints in the bundle and supplemented with yardage from my stash.

Nani Iro Dreams Quilt - In Color Order
This wasn't a project I wanted to try to quilt myself, so I sent it out to Gina Pina for quilting. I knew she had quilted with double gauze before and would feel comfortable working with this fabric. Something simple seemed like the right fit for the quilting. She did a beautiful meandering loopy design! Thanks, Gina!

Nani Iro Dreams Quilt - In Color Order
Since double gauze has such a different feel from quilting cotton, I wanted to try a different type of batting. I selected Quilter's Dream Orient Batting. It's a blend of bamboo, silk, tencel and cotton. It's airy and light and turned out to be an absolute perfect match. Between the fabric and the batting, this quilt is much more blanket-like than quilt-like. It has no stiffness whatsoever, it's like being under a cloud. It's super duper soft and very cozy. Also, the crinkle is crazy! The previous photo was taken unwashed, and the one above is after washing/drying. So crinkly!!

Nani Iro Dreams Quilt - In Color Order
I used more double gauze on the back, a big piece of yardage given to me by Deedrie (you're the best!), and more yardage from my stash. For the binding, I chose a light gray voile.

My Tips for Quilting with Double Gauze
Tips for Quilting with Double Gauze - In Color Order
Pre-washing and Starching: Double gauze has a tendency to shrink quite a bit. It's pretty loosely woven, so it can be prone to unraveling. Both of these factors make pre-washing important in my opinion. I normally only pre-wash fabrics for garments, but I'm glad I took the time to wash the double gauze for this quilt. I washed mine on cold and dried normally. In preparation for cutting, I used Flatter by Soak to give it a little extra stability and make it easier to work with.

Tips for Quilting with Double Gauze - In Color Order
Seams and Tools: When working with double gauze I find it helpful to use a nice new needle. My favorite size for working with fine fabrics is 75/11. I pieced my quilt with 50wt cotton thread. I generally use polyester when working with double gauze for garments, which also works great. I used 1/2" seam allowances when piecing this quilt to make it a little extra durable. I pressed all my seams to the side, alternating direction every other row so that my seams nestled. Double gauze seams can get pretty thick, but I wasn't comfortable pressing these seams open. My favorite sharp, thin pins are ideal for working with double gauze.

Tips for Quilting with Double Gauze - In Color Order
Finishing: Clearly I knew while make this quilt that I'd want it to last forever, because I took a lot of steps to ensure it would hold up to wear. After trimming off the excess backing and batting, I used my serger to finish the edges of the quilt. In my mind this helps with durability if the binding were to get worn, but I also found it made the edges lie flatter while attaching the binding. My last recommendation is to avoid double gauze for binding. It can be thick and difficult on garments, but I think it would be miserable to use on an all double gauze quilt! I was happy with the mix of textures with the voile binding on my quilt.

Nani Iro Dreams Quilt - In Color Order
Where to Buy: If you’re unable to find double gauze in your local fabric shops, here are a few shops I've ordered from that carry double gauze:

Miss Matatabi (JP)
Fabric Worm (CA)
Pink Castle Fabrics (MI)
Super Buzzy (CA)

Happy Quilting!

Thursday, August 25, 2016

Fenced In Quilt (and Free Pattern!)

Fenced In Quilt - In Color Order
Photo by Holly DeGroot

Happy Thursday! Today I'm here to share one of my recent quilt finishes my Fenced In Quilt!

Fenced In Quilt - In Color Order
This Summer saw the release of my friend Holly's first fabric collection with Cloud 9 Fabrics, Brush Strokes! I was immediately drawn to the colors in this collection, especially that purple! The prints have a beautiful watercolor look to them, which makes them really stand out. When the bundle arrived on my doorstep (thanks again Holly!), I knew right away what I wanted to make. I love when that happens.

Fenced In Quilt - In Color Order
Within a day or so I had the prints all cut and had started to sew. Normally I drag my feet when new fabric comes in, but that spreadsheet has really kept me motivated to use things!

Fenced In Quilt - In Color Order
Since this quilt is pretty small, I decided to quilt it myself. This meant visiting Michael at the lab to baste in the kitchen on his floor! It's right next to the room he works in, so it works out really well.

Fenced In Quilt - In Color Order
Photo by Holly DeGroot

Ta da! I love how soft this quilt looks. Since many of the prints are on white, the blocks blend in a bit more than if there was tons of contrast. It softens the lines between blocks and between prints, giving it a more subtle look.

Fenced In Quilt - In Color Order
Photo by Holly DeGroot

I have a hard time quilting free-motion these days, so it was straight lines for the win! I went for diagonal lines through each block. I love this type of quilting, it's a favorite for sure. It's forgiving, and quilts up really quick!

Fenced In Quilt - In Color Order
Photo by Holly DeGroot

For the backing I pulled an older Art Gallery Fabrics print from my stash. The binding is Cloud 9's Cirrus Solids in Lilac.

https://drive.google.com/open?id=1qWnmtps3wVkPfG7G_brUpbEIpaHI3kaX Download the free quilt pattern here.

Fenced In Quilt - In Color Order
Photo by Holly DeGroot

A huge thanks to Holly for taking these beautiful photos! I finished this quilt up in a hurry in time to bring it to our annual cabin weekend. She made it look so good!

Pattern: Fenced In Quilt Pattern
Fabrics: Brushstrokes, Cirrus Solids in Lilac*, Bespoken*.

Happy Quilting!

*Note: Any links marked with an asterisk in this post are affiliate links. This means if you click through and buy something, I make a small commission, at no extra cost to you.

Friday, August 19, 2016

Rectangular Logcabin Wall Quilt


Happy Friday! Today I want to share a fun all solids wall quilt that I made this Summer! RJR Fabrics approached me about participating in the What Shade Are You? blog hop, and I was excited to join in! I’ll be honest though, I was a little intimidated to work with just solids. It’s definitely outside my comfort zone, but I was excited to take on the challenge.


I have been itching lately to work with log cabin blocks, and I’ve had this particular design tucked away for a while. It’s been waiting in the wings for the perfect project. I liked the idea of changing the shape of the center of the block to a rectangle, to see how it would affect the overall look of the block. The blocks in my quilt finish as a square because of an extra log at the end, but otherwise, they’d finish rectangular. Cool!


There were so many colors to choose from when looking through all the Cotton Supreme Solids available, at first I was overwhelmed with the possibilities. I ended up choosing a color scheme based on a piece of artwork by Susan Driscoll of The Print Tree.

Here are the solids I used for my project: 218 Pink Sapphire, 278 Just Peachy, 301 Seafoam, 319 Overcast, 332 Marvelous, 333 Bougainvillea, 335 Feeling Blue, 362 Argento, and 358 Harlequin


For the quilting, I knew I wanted something non-geometric to break up the design a bit. I went with my tried and true wavy lines. These are done using a walking foot, and the quilt is smoothly turned to the left and right while stitching to get these organic, uneven lines. It’s a relaxing design to quilt, and it’s very forgiving!


I used 358 Harlequin for the binding and a Cotton + Steel print, Sprinkle in Petal, for the backing.


I’m hoping to find somewhere in our apartment to hang up this quilt, I am really happy with how it turned out. I may need to do some shuffling, there isn't much wall real estate left!

Thank you to RJR Fabrics for the opportunity to be a part of this event!

Wednesday, August 17, 2016

I'm Starting a Newsletter!


Happy Wednesday! Today I wanted to share the news that I am starting a newsletter! I have been thinking about doing this for a long time. I prematurely put up a sign up form last Summer, but I never sent anything. My apologies if you signed up! I put up the sign up without doing any concrete work towards actually putting something together. I felt so embarrassed when I finally took it down, realizing that I had been completely unprepared to take on the project.

Now I'm ready to dive in and really do it! I hope you'll join me! I think it's an interesting avenue to explore, and I'm excited to communicate with you in this way.


So what to expect from my newsletter? You'll hear from me up to twice a month, once at the beginning of each month and a second letter mid-month if there is anything else exciting to share. I'll be sharing a little bit of everything including projects from the archives, my favorite things from around the web, reader projects, and a tip/tutorial/free pattern each month! I also want to dedicate space to talk about what it takes to be a happy creative person (I'm still learning!), and how I am working to stay inspired and avoid burnout.

In addition, there will be a featured product each month with an exclusive discount code available only to subscribers. Sweet!


Phew, let's see what I can really pack into a single month! This is completely uncharted territory for me, and I'm excited to try something new. It will certainly be a learning experience, and I look forward to taking you along for the ride. I'm sure I'll make some mistakes along the way, but part of trying something new is figuring out what works and what doesn't. The only way to find out is to try!


Photo by Holly DeGroot.

I'll be sending my first newsletter in September. To kick it off, I'll be including a free quilt pattern! It's a PDF pattern for a simple throw quilt featuring Brush Strokes by Holly DeGroot. I'll be sharing more details about the quilt in a post next week.

Subscribe to my Newsletter! InColorOrder.com

Anyways, if you'd like to sign up, click on the button above or click here! There is also a permanent spot in my sidebar to sign up if you'd rather do it later.

As I'm embarking on my newsletter adventure, I'd love to know what your favorite email newsletters are, and what you like about them!

Thank you for your support!

Monday, August 15, 2016

Nani Iro Canvas Stowe Bag

Nani Iro Canvas Stowe Bag | InColorOrder.com
Happy Monday! Today I want to share a recent non-quilt finish. I normally keep my projects pretty varied, but lately I seem to mostly be working on quilts. I did squeeze in a bit of bag sewing earlier this month.

Nani Iro Canvas Stowe Bag | InColorOrder.com
My latest bag make is a new knitting bag using the Stowe Bag Pattern by Grainline Studio. I've had this Nani Iro Pierre Pocho canvas in my stash for a while and it seemed like the perfect project to showcase it. The lining is a quilting cotton from Volume II by Sweetwater. For the binding I pulled a Rowan Shot Cotton (in Spruce).

Nani Iro Canvas Stowe Bag | InColorOrder.com
I didn't completely follow the instructions for my bag. I used the main pattern piece to cut both an exterior and a lining. I gave the bag a boxed bottom by using the same technique that I use in the lined drawstring bag tutorial. I did all of this because I wanted a lined bag. I also chose to leave off the pockets. I rarely use the pockets on knitting bags that have them, so I decided to skip them.

Nani Iro Canvas Stowe Bag | InColorOrder.com
I struggled a bit with the binding, it didn't turn out super neat. The curves are pretty steep, and I ended up with a bit of wrinkling as I attached it on the outside. I'm trying not to let it bother me too much. The shot cotton probably wasn't my best choice for the binding, but live and learn! I would definitely use quilting cotton for the binding if I make another bag.

Nani Iro Canvas Stowe Bag | InColorOrder.com
The bag is pretty darn cute. It's a great shape and will be perfect for holding small/medium sized projects. I made the small size bag.

Nani Iro Canvas Stowe Bag | InColorOrder.com
Happy Sewing!

Thursday, August 11, 2016

Kawaii Magic Stars Quilt

Kawaii Magic Stars Quilt | InColorOrder.com
Happy Thursday! I'm excited to start sharing the quilts I've been finishing lately! I've been on a mission this year to work from my stash, but also to make things just for fun. Part of this means using fabrics that I've been hoarding. Another part of that is making things I've always wanted to make. It's been reinvigorating on the creative side, and now I can really enjoy those precious fabrics in finished projects.

Today I'm sharing my Kawaii Magic Stars Quilt!

Kawaii Magic Stars Quilt | InColorOrder.com
In January 2013, I participated in a Kokka Layer Cake Swap. We each bought yardage of a single print, cut it up into 10" squares, and swapped to end up with a layer cake of 26 different Kokka prints. At that time I was just starting to splurge on Japanese prints, and didn't have much of a stash of kawaii (ie: super cute) fabrics. There were so many good prints in the resulting layer cake, and it was immediately deemed too precious.

Kawaii Magic Stars Quilt | InColorOrder.com
Fast forward to this Spring, when I decided to add to the layer cake using prints from my collection of kawaii prints that I've collected over the years. I chose the Magic Stars Quilt Pattern by Aneela Hoey to show off these prints. I loved working on this pattern when I made my Mom's quilt: Emmy Grace Magic Stars Quilt. It's a really fun pattern, and I'd make it again!

Kawaii Magic Stars Quilt | InColorOrder.com
I did one thing wrong this time that resulted in a much scrappier look. I didn't pay as close attention to the directions this time around and forgot to pair like blocks together in the last step. This was 100% my error, and was definitely a result of "I've already made this, I know what I'm doing". It happens to us all! I think there is so much going on with the prints that it's okay.

Kawaii Magic Stars Quilt | InColorOrder.com
Just like the first time I made this quilt, I added an extra row of blocks to make it a little bigger. I like the little bit of extra length and it completes the final row of stars.

Kawaii Magic Stars Quilt | InColorOrder.com
I pieced together a backing of more Japanese prints, including a big chunk from a friend. It felt good to use up some yardage as well as a few smaller pieces. This quilt was quilted by local Madison quilter, Gael Boyd of Stitchlilly. Thanks for a beautiful job Gael! It's bound in Sprout Cirrus Solid from Cloud 9.

Kawaii Magic Stars Quilt | InColorOrder.com
Happy Quilting!

Monday, August 8, 2016

July 2016 Report

July 2016 Report | InColorOrder.com
Happy Tuesday! I'm finally back in this space today to share my July report. I didn't mean to take a break, but things do seem to slow down a bit in the summer. I know I've been moving at a slower pace! I've been sewing a lot, but need to buckle down and take photographs of all my makes and just get back into the swing of things.

July 2016 Report | InColorOrder.com
July was pretty hot for us, so there were quite a few days that I couldn't work in my sewing room because of the heat. Some days I worked on the computer and for a few days I brought my machine to the kitchen to sew near the A/C unit. I still managed to get a lot done, which felt good.

July 2016 Report | InColorOrder.com
I picked up my Drachenfels shawl again. I'm now into the second section which has stripes, and I really love it. I know that it will be much more enjoyable from here on out. I'm really pleased with the colors I chose.

July 2016 Report | InColorOrder.com
Brushstrokes fabric by Holly DeGroot for Cloud 9 Fabrics.

As I've mentioned, to keep myself accountable I'm tracking my yardage for both yarn and fabric. Here is how I did in July:

July Fabric
Used up: 34.75 yards
Brought in: 22.5 yards
Net: -12.25 yards
Year to date: -33.875 yards

July Yarn
Used up: 0 yards
Brought in: 0 yards
Net: 0 yards
Year to date: +1087 yards

July 2016 Report | InColorOrder.com
Looking at my goals, I did okay this month. I didn't end up working on my double wedding ring wedges. My goal was 15 per month which would have them finished in October. I've been making 16 per month, so I decided to let myself skip July and means I need to make 18 per month these next three months. I completed one quilt start to finish, and completed three others. Two of the four I quilted myself, which I hadn't done in a long while! Just straight lines, but still! I also made a few quilt blocks and a scissor cozy. I worked on my Archer Popover, have plenty of details to finish up.

July 2016 Report | InColorOrder.com
I have two deadlines to work towards this month, and I'm also really hoping to release my two new patterns. Those are going to be my primary focus. I'm starting to get excited about Fall, the weather makes it much more comfortable to sew!


George bunny says "Hi!". I took this video of him in his giant bag of hay, he was enjoying a feast! It's a little dark but still enjoyable!

Happy Sewing!