April Quilty Box
Friday, April 29, 2016
Last year I was approached by the lovely folks behind Quilty Box about a potential collaboration. Quilty Box is a monthly subscription box for quilters! Each month's box is filled with a variety of fun products, curated by designers, bloggers, and organizations. The April Quilty Box was curated by me! It was a really cool experience helping to chose the products for the box, and have the opportunity to share my work with their subscribers.
I shot a little unboxing video of my box! The theme of my box was triangles! It includes the following: Blockade Mini Quilt Pattern, a freebie using half-square triangles that I designed just for the box. Geese in Flight Quilt Pattern which features no-waste flying geese and includes five quilt sizes. Triangularity Quilt Pattern which uses equilateral triangles and features five quilt sizes and custom sizing options. A nine fat quarter bundle of Joel Dewberry's Wander fabrics, in cool blues and mustard. A bottle of Flatter by Soak, great for keeping your triangles in check! And finally a spool of So Fine polyester thread by Superior Threads.
I wanted to share a few photos of the mini quilt I made! I used Pure Element solids by Art Gallery Fabrics. I've been trying to stretch myself and use solids more often. This mini was a fun excuse to do that!
I quilted this mini with straight lines, using the half-square triangle seams as a guide. I used my Clover Hera Marker to mark out my quilting lines. I washed and dried it get rid of the lines faster.
For the backing I used a print from Nordika and bound it up in a print from Indelible.
If you're not a Quilty Box subscriber, they have a few of my boxes available in their online shop, here! To learn more about the subscription and to sign up, see here.
Happy Quilting!
Wednesday, April 27, 2016
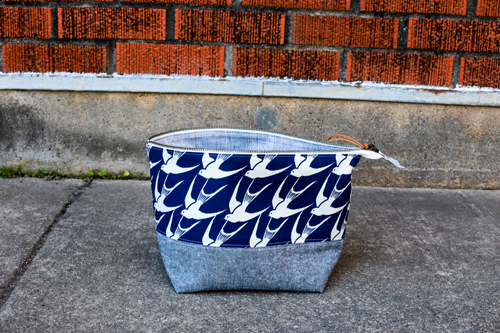
I had a lot of fun making the Maker’s Tote Pattern by Anna Graham. I hesitated a little at first when I saw that I’d need to hand sew the binding down to the from at the end, since I don’t have a lot of experience binding by hand. I wasn’t sure I’d have the patience for it, or if I’d do a good enough job. Turns out, I'm not too bad at it!
When I saw this sheep canvas from Ellen Luckett Baker’s Charms collection, I quickly snatched up a 1/2 yard of each color. They’re too cute, and I knew they’d make great knitting bags. For this project I decided on the mustard color, which is my favorite of the three. I wanted to keep the other fabrics pretty neutral. I chose a black and cream gingham from an old Sweetwater collection (not sure which), gray Heath, Widescreen in Yarrow, and black yarn-dyed Essex cotton/linen.
I made a few minor modifications for my tote. I left off the front flap pocket, I didn’t want to cover up any of those sheep! I also used a non-separating metal zipper. I used a 16” zipper instead of a 14” zipper to compensate. I covered the end with a tab like in the Open Wide Pouch Tutorial. It worked out great, and still opens completely. Other than these two things, I followed the instructions to a T!
I buy all my zippers from Zipit.
Pockets are at the most risk of getting left off when I make bags. I don't tend to use a lot of pockets. For this bag though, I knew I'd definitely get use out of the interior pockets. There are slip pockets on one side and pleated pockets on the other. Perfect to hold my knitting pattern and other notions. The zippered pocket on the back will be good for stitch markers and little scissors. Things that could otherwise fall out or get lost in the bigger interior pockets.
I hardly ever hand bind anything, and like I mentioned I was afraid I wouldn't have the patience for it. Honestly though, it was actually pretty enjoyable. I was able to work on it while watching TV and even while we got our car's oil changed. I used lots of wonder clips to hold things in place. A nice sharp needle and my favorite thimble and it really didn't take that long. I'm pretty darn proud of how nice it looks! Taking the time to do it by hand was totally worth it.
I love a good knitting bag, and this pattern really fits the bill. When open, it sort of functions as a basket. It stays open and is nice and roomy. I am able to fit three skeins of sock yarn in the small size bag, plus my project and all the notions I need. Right now I'm knitting Drachenfels by Melanie Berg.
Happy Sewing!
Monday, April 25, 2016
Happy Monday! During the month of April, I'm doing a bit of Spring cleaning in my shop (incolororder.bigcartel.com)! Each Monday in April, I'll be announcing a new sale. The sale will run from Monday to the following Sunday!
This week, everything that ships is on sale! Newly on sale this week is $5 George Pillow Panels and $5 Project Bags! My book, threads and paper patterns are also on sale again. The sale is good through April 30th.
As an added bonus, I'll be including an extra goody in all sale orders! A paper pattern, George button, or maybe even some fabric!
Shop the sale here.
Prices have been adjusted, no coupon code needed. While supplies last.
Friday, April 22, 2016
Happy Friday! Today I want to share a bit of what I've been working on at the moment!
I finished up my Maker's Tote last week, I'll be sharing lots of photos of it soon. I love how it turned out! I've been using it for my most recent knitting project!
I've made a couple drawstring bags in the last few weeks. This one is scrappy patchwork style! It uses 2.5" squares, which is a great scrap size. I have a free tutorial for making a patchwork bag here. I used some yellow measuring tape twill to finish it off. I realized after making this one, that it's a perfect use for those mini charm packs. I have since sewn up two more panels from mini charms to make more!
Jacey and I are always scheming new projects, and last week we were both digging through our stashes. I rediscovered these old Prints Charming fat quarters and we decided they needed to be a bag! I was able to squeeze a project size drawstring bag out of it since one fat quarter was oversized. It was fun to use up fabrics that have been in my stash for a while!
Last week my Mom came to visit for a few days! While she was here, we stitched up a cosmetic bag for my Aunt Karen for her Birthday! We used the tried and true Open Wide Pouch by Anna Graham, making the large size. It was really fun choosing fabrics and notions together. I think the bag turned out really cute!
I buy all my zippers from Zipit.
I've been working on an all blue version of the Woven quilt from Patchwork Essentials! I realized when I rearranged my fabric stash at the beginning of the year that the color I have the most of is blue. An all blue quilt seemed like the best way to try to make a dent in my blue stash! I'll share more on this project very soon, I am almost ready to start sewing the blocks!
This past weekend we had amazing weather, and I took advantage of it by doing a bit of cutting outside! I was in a Kokka layer cake swap a couple years ago and I'm finally making something with the squares. I cut some more from my stash to go with it, and I'm making another Magic Stars Quilt. This one is a lot crazier than the last one I made!
I have been slowly working away on my vintage sheet scrappy trip quilt! I now have half of the blocks put together, so that's progress! Looking forward to putting this one together and enjoying it!
Have a great weekend!
Wednesday, April 20, 2016
Happy Wednesday! I'm excited to finally be sharing a recent finished garment today! I have been doing a lot of garment sewing lately, but the weather hasn't been nice enough to get photos of any of them. This past weekend it was in the high 70s, perfect weather for some grilling, and a few photos!
I purchased the Emery Dress Pattern by Christine Haynes almost two years ago. I am not a huge dress person, but dresses are my go-to when I need to get dressed up for something. I've slowly learned what types of dresses work best for me. One style that has consistently been good to me is fit and flare style dresses. If it's got a retro vibe, even better. This pattern is exactly that!
I don't know exactly what took me so long to finally try this pattern out. I was a bit nervous about the bodice, with all the darts, lining, and invisible zipper. Turns out, I had nothing to be nervous about. I did a quick muslin of just the bodice (and lining), without the zipper. The size I chose (based on my measurements and the finished garment measurements), was a perfect fit! Lucky me!
It was a nice change of pace to work on a garment with no bias tape. It's a fine seam finish, but sometimes it's nice to have a bit of a break from it! The bodice on the Emery is lined, which is really neat. I even took the time to hand stitch the lining where it meets the skirt, as instructed. I'm often prone to skip these types of things and do it by machine. I'm glad that I took the time to do it right, it was worth it.
The fabric I used is from Wild & Free by Maureen Cracknell. I bought enough for a dress after seeing this skirt made by Rachel. I hadn't really thought about the print much for garments, but that skirt is so cute, I had to buy some of that fabric! I was a little nervous the dress would end up looking like a tablecloth, but I decided it was worth the risk. I lined the bodice with some white Cambridge Lawn, it's a great lining fabric.
One of my favorite TV shows is Agent Carter, a Marvel show set in the mid/late 1940s that follows Agent Peggy Carter. Peggy has some really killer outfits in the show while kicking some serious butt. This dress feels like something she would wear! So, this is my Peggy dress!
I am so happy with how this dress turned out, I am looking forward to making many more. Next I'd like to make one from a vintage sheet! I think sheet fabric will have the perfect amount of drape, and I have a stash of pretty prints to choose from!
Happy Sewing!
Monday, April 18, 2016
Happy Monday! During the month of April, I'm doing a bit of Spring cleaning in my shop (incolororder.bigcartel.com)! Each Monday in April, I'll be announcing a new sale. The sale will run from Monday to the following Sunday!
This week, I'm holding a sale on paper patterns! All full-size patterns are $2 off, and postcard patterns are $1 off! The sale is good through April 24th.
As an added bonus, I'll be including an extra goody in all sale orders! A paper pattern, George button, or maybe even some fabric!
Shop the sale here.
Prices have been adjusted, no coupon code needed. While supplies last.
Friday, April 15, 2016
Happy Friday! Earlier this month I was able to chat with Sandi Hazlewood of the Crafty Planner Podcast! We talked about a little bit of everything, including my curation of this month's Quilty Box (more on that next week!). Have a listen on Sandi's website here.
Have a great weekend!
Monday, April 11, 2016
Happy Monday! During the month of April, I'm doing a bit of Spring cleaning in my shop (incolororder.bigcartel.com)! Each Monday in April, I'll be announcing a new sale. The sale will run from Monday to the following Sunday!
This week, I'm holding a sale on thread! All thread boxes are $10 off! This includes both sizes of my Aurifil thread collections, Tidbits and Favorite Things. Plus, all thread orders include a free pattern! The sale is good through April 17th.
As an added bonus, I'll be including an extra goody in all sale orders! A paper pattern, George button, or maybe even some fabric!
Shop the sale here.
Prices have been adjusted, no coupon code needed. While supplies last.
Wednesday, April 6, 2016
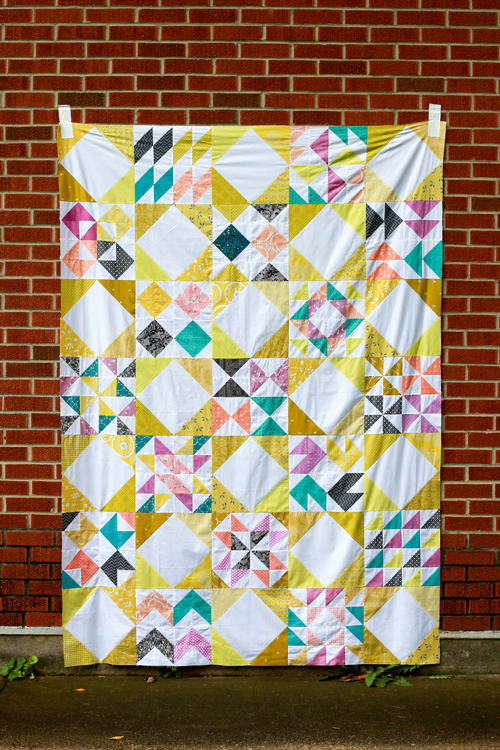
Happy Wednesday! I'm so happy to bring you the first of a series of quilt settings to accompany my book, Patchwork Essentials: The Half-Square Triangle. I wanted to share something that would be a good add-on to the 60 Block Chart included in the book! The blocks in that section can be used in many ways, including in the final chapter of quilts in the book.
See this finished quilt here.
Over the next few weeks/months I'll be sharing additional quilt settings (layouts!) that you could use with those blocks, blocks from my Simply Sampled or Half-Square Triangle Sampler patterns, or any 12" finished quilt blocks! The quilts will be different sizes, and take a different number of blocks. I'll be sharing instructions for the quilt setting only, not the blocks. I will however be sharing fabric requirements to help guide you on making the half-square triangle blocks from the book needed for each setting!
The first quilt setting I am sharing is a big one! It's mostly made up of blocks, so you don't have a lot of extra work to do after those are done!
Still need a copy of my book? Pick one up here!
Sewing Level: Intermediate/Confident Beginner
Finished size: 60"x84"
Materials:
- (27) 12.5" unfinished quilt blocks
- 1 1/4 yards of background fabric
- 5 1/4 yards of backing fabric
- 68" x 92" piece of batting
- 5/8 yard of binding
- Coordinating thread
Notes:
WOF = Width of Fabric (42")
Fat Quarter = 18" x 21"
Cutting:
From background fabric:
- Cut (3) 12.5" x WOF strips
- From each strip, cut (3) 12.5" squares for a total of 8
From binding fabric:
- Cut (8) 2.5" x WOF strips
---------------------------------------------------------------------------------------------------------------------
To make 27 half-square triangle quilt blocks, you'll need:
2-at-a-time HST method | 4-at-a-time HST method | 8-at-a-time HST method | |
---|---|---|---|
Print fabric | 11 fat quarters | 12 fat quarters | 14 fat quarters |
Background fabric | 2 1/2 yds | 2 5/8 yds | 2 1/2 yds |
---------------------------------------------------------------------------------------------------------------------
Instructions:
*Use a 1/4" seam allowance unless otherwise noted.*
1. Arrange blocks using the diagram.
2. Sew blocks together in each row. Press seams in one direction, alternating direction every other row.
3. Sew rows together. Press seams open.
4. Cut backing yardage in half. Press. Trim off the selvedges and sew your pieces together lengthwise. Press seam open.
5. Basting: Using masking or painter’s tape, tape the backing to a clean, hard surface, right side down. Spread out your batting on top of the backing. Smooth out any wrinkles. Carefully spread out your quilt top on top of the batting, right side up. Pin your top, I like to use curved safety pins, spacing the pins a few inches apart. Make sure that your pins are going through all three layers.
6. Quilting: Quilt as desired, by machine or by hand. Trim away excess batting and backing fabric.
7. Binding: Trim off selvedges and sew your binding strips together to form one long strip, press seams open. Fold in half lengthwise, pressing with your iron as you fold. Attach binding using your preferred method. For a detailed tutorial on attaching your binding to both sides by machine, see here.
Enjoy! Share your progress and finished quilt photos using the #patchworkessentials hashtag on social media or add it to the In Color Order Flickr Group!
Check out the other free quilt setting tutorials in this series:
Interlaced Quilt Setting Tutorial
Blockade Quilt Setting Tutorial
Monday, April 4, 2016
Happy Monday! During the month of April, I'm doing a bit of Spring cleaning in my shop! Each Monday in April, I'll be announcing a new sale. The sale will run from Monday to the following Sunday!
This week, I'm holding a sale on books! I have a limited number of copies of books that I've contributed to, plus copies of my book! They're all on sale from now until April 10th.
As an added bonus, I'll be including an extra goody in all sale orders! A paper pattern, George button, or maybe even some fabric!
Shop the sale here.
Prices have been adjusted, no coupon code needed.
Friday, April 1, 2016
I can't believe March is already over! As usual, we had crazy weather from 70s to snow. Typical March. I'm definitely looking forward to warmer weather and things are just starting to turn green, which is always exciting. I tend to get a bit blue at the end of winter, everything just looks so gross and dead. I love the transitional seasons, so seeing things start to spring up is promising!
This month, I tried to blog off a schedule, something I'd like to do more of. For most of the month it worked great! But, at the end of the month I got off track. It's hard to keep to a schedule if you don't finish the things you schedule to blog about! Hopefully I can get back on track for April.
I didn't do a ton of sewing this month, between working on pattern stuff and trying to take it a bit easier. I did get my Glamp Stitchalot Quilt finished, which was a big win! I also cut out a lot of projects. Five garments, a quilt and a Maker's Tote. Looking forward to stitching those up!
There wasn't much knitting going on either. Started the second Fiddlehead mitten, but haven't gotten too far. I did start a new hat, a Citadel. Hats are one of my favorite things to knit. Jacey and I did a bunch of scheming this week and helped me pick yarns for two new projects that I am happy about.
To keep myself accountable I'm tracking my yardage for both yarn and fabric. Here is how I did in March:
March Fabric
Used up: 24.5 yards
Brought in: 55 yards
Net: +30.5 yards
Year to date: +44.75 yards
March Yarn
Used up: 652 yards
Brought in: 0 yards
Net: -652 yards
Year to date: -739 yards
So, there is some explanation on the fabric this month. First, I was sent 17 yards of the new Denims from Art Gallery Fabrics. I also went on a weekend trip with friends up to S.R. Harris in Brooklyn Park, MN (a massive fabric warehouse!) at the beginning of the month. Plus, I received quite a bit of fabric as gifts this month, only 21 of those 55 yards were purchased. Obviously I need to make up for this huge intake in the next few months! On the yarn side, I didn't finish any projects but I did send a bunch of worsted/dk scraps to Amanda for her scrappy crocheted blanket project! Also, I should note, I'm not counting any fabric as used up until I've finished the project completely.
For my other goals, I didn't make too much of a dent this month. I did finish my double wedding ring monthly goal, so that's something! I cut two garments I've never made before: a Josephine Blouse and an Archer Popover. I'm looking forward to working on those. I didn't end up making a list or evaluating my works in progress. I did work on putting together a quilt top for the traveling bee I'm in, Fantastic Quilt Voyage. I even pieced a backing! I also sewed up an all double gauze Nani Iro quilt top that I'm really excited about!
I completed another month of Project 365: a photo a day using my DSLR camera.
George bunny! He is recovering from his Easter duties! :)
Happy April!
Subscribe to:
Posts
(
Atom
)