Favorites
Friday, December 28, 2012
1. big block beauty, 2. Mod Pop Top done!, 3. the puzzle {finished quilt}, 4. Quilt for my Sister in Law - Finished, 5. Tilt a Whirl Baby Quilt Pattern, 6. Space Dust mini: finished!, 7. Arkansas traveler block for pillow top. Merry Christmas mom!, 8. Honeycomb4, 9. quilt standing
Every week I go through my favorite photos on Flickr, and choose nine sewing/quilting related projects to showcase here. These photos and projects are not my own, you can find the original images and creators by clicking the coordinating links! If for any reason you do not want your project featured here, please email me and I'll remove it!
Happy Friday!
Thursday, December 27, 2012
Hi there! Popping in quickly today to share another round of thrifting adventures before we board a plane for Virginia to see Michael's family! I took most of these photos in antique stores when my Mom was visiting! Oh how I wish I could have brought all these things home with me! Especially this tin above!
The pattern on this file box reminded me of a vintage sheet!
This box was cardboard, I think it may have had Christmas cards in it at some point.
How sweet are these accordion paper ornaments? And still in the box!
I'm kicking myself for leaving these candles behind at the thrift shop, they are cool for their boxes alone.
Pretty blue sewing machine! Spotted quite a few sewing goodies.
Love this vintage zipper display. I've never seen zippers rolled up in little canisters like this before!
I really wanted to bring home this sewing machine needle display. It still had many of the wooden needle canisters in it.
This vintage dresden plate quilt was in great condition, and looks so modern!
Another great vintage quilt. I am always tempted by the quilts!
Happy Thrifting!
Monday, December 24, 2012
Merry Christmas and Happy Holidays from Jeni, Michael, and George Bunny! :)
Sunday, December 23, 2012
Happy Sunday! Hope you're all having enjoyable weekends. We made the drive to Ohio on Saturday, thankfully all the storm was completely clear of our route, it was smooth sailing. Not too much traffic either!
Thanks for your kind words on my duffle bag! I'm looking forward to testing it out when we fly to Virginia next week! If you're looking for the pattern, you can find it for sale at Fat Quarter Shop, here.
I had to share a little scene from the storm on Thursday. We got just about all 17" of snow they said we'd get. It was so pretty. The roads still weren't great even by Saturday, so we were happy to leave that behind. We did end up loosing power, but not until about 9pm, and only for a few hours. Thankful it was back on when we woke up Friday!
I got brave and cut into my Color Me Retro yardage before we left! I have to admit, it sure does look pretty all bundled up! :)
There has been some drawstring bag making this month. I love using the bags for gift wrapping or to hold small projects. Above I've made the everything size (same size as the tutorial), the snack size and the tiny size which are all in the pattern.
I keep forgetting to share this video with you! The lovely folks at Fat Quarter Shop interviewed me about Color Me Retro at Quilt Market this Fall!
George!
Today I love the..
Smell of: Cake
Sound of: A Year Without a Santa Claus
Taste of: Cheese souffle
Sight of: George
Feel of: Freshly washed quilt
Good Things about Today:
- Found a Christmas Hello Kitty t-shirt at Target!
- Made Bretzel!
- Had a relaxing day.
- Getting ready for the holiday!
Labels:
Bags
,
Bunny
,
Color Me Retro
,
Lined Drawstring Bag Pattern
,
Sewing
,
Travel
Friday, December 21, 2012
1. I made a quilt! And blogged about it! It feels like its been a while. #desertstars #quiltcon, 2. Paper Piecing star 3, 3. Christmas mod pop done!, 4. Neutral Prisms, 5. Orange Trails, 6. Punch Drunk Quilt, 7. SLMQG EZ Dresden Challenge, 8. Kaleidoscope Quilt, 9. Deconstructed Log Cabin Front
Every week I go through my favorite photos on Flickr, and choose nine sewing/quilting related projects to showcase here. These photos and projects are not my own, you can find the original images and creators by clicking the coordinating links! If for any reason you do not want your project featured here, please email me and I'll remove it!
Happy Friday!
Thursday, December 20, 2012
Another morning post, this time because of the weather! We're in the middle of our first big snowstorm in Wisconsin, and blizzard conditions are supposed to start at noon. I thought I better blog earlier rather than later! Glad I don't have to leave the house all day!
I'm so happy to cross this finish off my list! I started this bag in the beginning of November, working on it here and there when I found time. The pattern is the Holiday in London Duffle Bag by Bari J (you can find it for sale here). I choose to deviate from the pattern slightly by using patchwork panels constructed using a quilt as you go method. This means leaving out interfacing and using batting + cotton duck canvas. I also left out the final step of pintucking the edges. I started and my machine was just not having it, too many thick layers!
The patchwork portion of this bag took so much longer than I expected. I'm just glad that it was worth it! I started with Pat Bravo's Rock n' Romance and added Art Gallery blenders and prints in similar colors from other lines. All the quilting was done with my favorite color of Aurifil 50wt thread, #2600, a light gray.
The bag features handles and a long strap, which is awesome. I've always missed having a long strap on my other duffle bag. I had no luck finding the hardware locally, so I ordered it from here.
I used Anna's super easy tutorial for making piping. I didn't know it was so easy! I could have stitched a little closer when I stitched it in place, but oh well. It was my first time using piping, so I was happy as pie just to get it on there!
This was my first time using a metal zipper (successfully), and I like how fancy it looks. I added a bit of faux leather cord as a zipper pull.
The inside features the same pockets as the outside, and a removable stiff bottom. I might remake mine, I cut it a little small on accident, so it doesn't really do it's job. I think I'll use thick template plastic next time.
It was a race against the clock that got this bag finished up. We're leaving for Ohio (cross your fingers this storm finishes in time) on Saturday and I really wanted to take it home with me. It's going to hold a lot of stuff! Here is a size reference photo with my clear ruler.
I think if I make this bag again, I'll use the recommended fabric and interfacing. There were definitely times when I knew my choices (lots of seams, batting, canvas) were making things more difficult than they needed to be. Thank goodness I love it, and patchwork!
Happy Sewing!
Tuesday, December 18, 2012
Good Morning! I don't often post in the morning, but by the time I found myself sitting down to post last night it was nearly 11:00pm. I tend to get goofy after about 9:30pm, so I thought for your sakes I better wait until the morning!
It's high time I catch you up on what has been happening over here lately! The biggest and most exciting bit came as a surprise yesterday! Color Me Retro advance yardage arrived!! Seriously, I nearly passed out. I was going through the full gamut of emotions, I'm not sure how I ended up getting anything done the rest of the day! It looks and feels so good on Art Gallery Fabric's fantastic base cloth. I can't wait to stitch up clothes and all kinds of other goodies!
Color Me Retro will hit stores in February, so just a little bit longer to wait! (If you're a shop that ordered it, please leave a comment or email me, I'm putting together a list on the Fabric page!)
I've been sewing! I took this mini quilt that I started to Quilt Camp with me last weekend! I actually got a lot of sewing done while I was there, I ran out of projects! Such a good problem to have! Thankfully I brought lots of scraps to play with so I was never bored or anything. It was an awesome time, I'm bummed I didn't take more pictures. The campers were a blast and you should have been all the sweet drawstring bags they were making! A big thank you to everyone who attended, my fellow teachers, Faith and Heather, and Brenda for teaching and putting it all together! She's holding another retreat in May, just wait until you see who is teaching! You won't want to miss it!
Anyways! This mini quilt was made using Christina's Ornate Pattern that she taught at Sewing Summit. I had the top done, it just needed quilting and binding. I ended up going with random diagonal lines for the quilting, and I'm so happy with how it turned out. I'm also really into quiet bindings at the moment. I used the same fabric for the background and the binding, Art Gallery Pure Element solid in White Linen.
I jumped back on the wagon and sewed myself another shirt! It had been a little while! I have a stack of Art Gallery Voiles that are taunting me, and this one just had to be a shirt. I wear my voile tops the most, so it only made sense. I used the Wiksten Tank Pattern and added sleeves to it from the Grainline Scout Tee Pattern.
There has been a lot of baking going on over here! One of my very favorite cookies in the world are Lebkuchen, which is basically German gingerbread. We traveled to Germany and had them in Nürnberg when I was a kid, and I look forward to eating them every year. This year it hit me that I should just try making them. So, instead of being sensible and finding candied citrus peel in stores (an ingredient needed), I made some myself! It was fun, but a bit tedious. On the plus side they're pretty good to eat themselves! I used this recipe.
I went through one round of the Lebkuchen recipe but it needs lots of tweaking. Hopefully I'll eventually get it right, when I do I'll post it here!
I added another pair of embroidery scissors to my collection this weekend! Lei and I went out shopping and found these at a local antique mall. They were only $5!
George bun is looking as cute as ever, of course! :)
Today I love the..
Smell of: Caramels
Sound of: Harry Potter 5 audiobook
Taste of: Chocolate cookies
Sight of: George
Feel of: Warm socks
Good Things about Today:
- More baking planned!
- It's supposed to snow!
- Going to sew!
- Watching Christmas movies all day!
Friday, December 14, 2012
Welcome to the Half-Square Triangle Block of the Month! For each month in 2012, I'll present a quick tutorial for a traditional quilt block using half-square triangles (HST)! Feel free to join in at any time! For past posts see here.
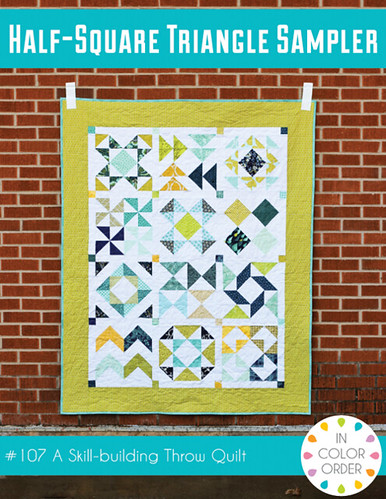
Yay! It's finally time for the reveal of our Half-Square Triangle Block of the Month Quilt! It's been a fun year, let's wrap this puppy up!
Finishing Instructions
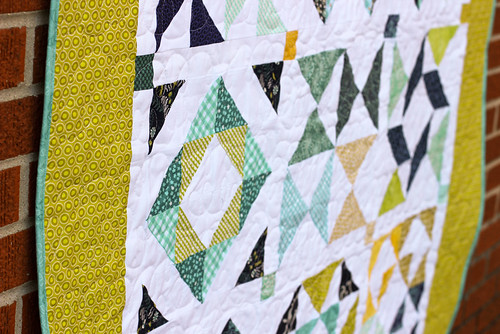
You may of course choose to put your blocks together however you like! I'm provided instructions here to construct your quilt like mine. It features sashing with cornerstones and large borders to give it a bit more size. I choose to quilt mine with my signature free-motion loops! It has now been washed and it's crinkly soft goodness enjoyed! Now, let's finish your quilts!
Materials:
- 2/3 yard of sashing fabric
- Print scraps from your blocks
- 1 yard of border fabric
- 3.5 yards of backing fabric
- 62”x75” piece of batting
- 1/2 yard of binding fabric
Seam Allowances: 1/4" unless noted
Finished Size: 54"x67"
Cutting:
From sashing fabric:
- Cut 11 strips, 2” x WOF
- Subcut strips into 31 rectangles 2”x12.5”
From print fabric scraps:
- Cut 20 squares 2”x2”
From border fabric:
- Cut 6 strips, 6” x WOF
- Subcut 2 strips into rectangles 6”x25.5” (2 total)
- Trim remaining strips into 6”x42” rectangles
1. Press all your completed blocks and trim to 12.5" if needed.
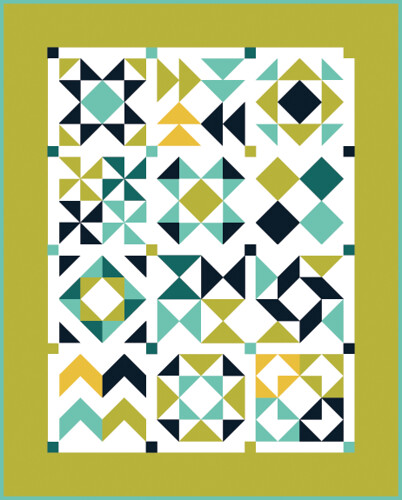
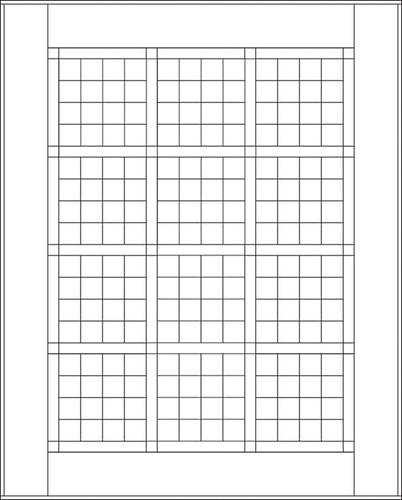
2. Lay your blocks out using the diagram above. There is a blank worksheet here (also seen below) that you can download and fill in with your own unique layout. You’ll have four rows of three blocks each.
3. Sew a 2”x12.5” solid sashing piece to the left side of each block. Press seams towards the sashing.
4. Sew your blocks together in each row, making sure there is a sashing strip between each block. Add an additional 2”x12.5” solid sashing piece to the end of each row. Press seams towards sashing.
5. Construct your horizontal sashing pieces by sewing a 2” print square to one end of each remaining 2”x12.5” solid piece. Press seams towards solid.
6. Sew these pieces together into five strips, each strip containing three solid pieces and four squares. Press seams towards solid.
7. Sew your rows together with a row of blocks between each pieced sashing strip. Press seams open.
8. Now it’s time to add the borders. Take two 6”x42” pieces and sew them to the top and bottom of your pieced top. Press seams open.
9. Take two 6”x42” pieces and sew two 6”x25.5” pieces to the end of each one. Press seams open. Strips should measure 6”x67”. Sew these two strips to either side of your quilt top. Press.
10. To make your backing, cut your yardage in half. Press. Trim off the selvedges and sew your pieces together lengthwise. Press seam open.
11. Baste (tutorial), quilt, and bind (tutorial) as desired. Binding yardage listed is for 2.5" strips, you'll need six.
Voila! You're done! I hope you'll be posting your blocks, finished quilts and projects made from this series in the In Color Order Flickr Group!
These tutorials will all remain available on the blog, they'll simply move to the tutorials page after the first of the year! I've turned all of the information from our series, including both half-square triangle construction methods, all twelve blocks, and finishing instructions into a PDF pattern, for those that prefer having everything in one place! You can find the Half-Square Triangle Sampler Quilt pattern here.
Want to make extra blocks and a bigger quilt? Use the block patterns in this series and make any of these three free quilt settings:
Over And Above Quilt Setting Tutorial
Blockade Quilt Setting Tutorial
Interlaced Quilt Setting Tutorial
Happy Quilting!
Wednesday, December 12, 2012
Hi There! Didn't really mean to take much of a break from this space, but it took an extra day to recover from Quilt Camp (put on by Pink Castle Fabrics)! It was such a blast, I'll share more about it this weekend! For now, I'm SO excited to finally be able to share this quilt with you!
This is one of my favorite quilts I've ever made. It's called the Mini Claw Throw and it appears in a brand new book from Martingale Publications called Modern Quilts from the Blogging Universe. A year ago I sent away this quilt to be included in the book and boy do I miss it! I did get to see it at Quilt Market though as a part of the schoolhouse for the book!
It was inspired by traditional bear claw quilts. There are still claws, but they are from a baby bear instead of a full-sized bear! The variety of prints and lack of sashing give this traditional quilt a modern twist. I was so happy with the way the teal "claws" ended up forming stars!
It's interesting to look back on how your style changes or remains the same over time. With this quilt I think I was just beginning to find my personal style. Curly doodle quilting, loads of different prints, scrappy backing, luxurious voile binding. Most of these things I still incorporate into my quilts!
I am really impressed with the way this book turned out, and I am tickled to have a quilt in it! I'll be chatting more about the book itself in the new year, but I just couldn't wait any longer to share my quilt. For now, you can find the book on Amazon, the Martingale website, your local quilt shops, and other major retailers!
PS - Did I mention there are 19 quilts in this book?! So much goodness!
Sunday, December 9, 2012
Thank you to everyone who entered the Sew, Mama, Sew Giveaway Day giveaway! I really enjoyed hearing about your favorite holiday treats, gave me some ideas for my gift giving!
The winner of the pattern bundle is #208, Annette!
Happy Sewing!
The winner of the pattern bundle is #208, Annette!
Happy Sewing!
Friday, December 7, 2012
1. PTS9 Sent, 2. Dots on Dots blog hop- pillow 3, 3. pixel gingham bunny baby quilt, 4. improv circles wall quilt, 5. Basted and ready to appliqué!, 6. Stacked Quilt Block Quilt, 7. Flying Geese and Swans, 8. The Full Stops Quilt, 9. Mountains Managed Quilt
Every week I go through my favorite photos on Flickr, and choose nine sewing/quilting related projects to showcase here. These photos and projects are not my own, you can find the original images and creators by clicking the coordinating links! If for any reason you do not want your project featured here, please email me and I'll remove it!
Happy Friday!
Thursday, December 6, 2012
Good morning! Just wanted to pop in quickly before I get on the road for Quilt Camp! I'm excited to spend the weekend sewing and quilting, and talking waaay too much I'm sure! :)
I won't be bringing my computer, so just a heads up, I won't be able to answer my email until I get back on Sunday! So don't be alarmed if you don't hear back right away!
Happy Weekend!
I won't be bringing my computer, so just a heads up, I won't be able to answer my email until I get back on Sunday! So don't be alarmed if you don't hear back right away!
Happy Weekend!
Wednesday, December 5, 2012
Happy Wednesday! How about a super quick and simple tutorial for today? I've had these metal scissors in my sewing stash for years. I think they were maybe hand me downs, or they were in a box of thrifted notions, who knows! I've never been able to use them because the metal handles hurt my hands too much.
I recently had them sharpened just in case, since they would be especially nice to use for garment sewing. The other day it hit me, wrap them up in fabric to make them easier to hold AND prettier! I thought I'd write up a quick tutorial in case anyone else wanted pretty, comfortable scissors too!
Sewing Level: Beginner Friendly
Materials:
- 1 pair metal scissors
- 2 torn strips of fabric 1"x44" (I'm using Art Gallery Nature Elements in Hot Pink)
- Glue
1. To tear your strips, cut a small (.5") slit in the selvedge of your fabric. Holding the fabric on both sides of the slit, pull hands apart, ripping the fabric strip. This ensures that your scissor handles won't fray like crazy! Pull off any stray threads. Trim off selvedges.
2. Put a small dab of glue on your scissor handle (I used super glue because these aren't very fancy scissors and I want it to be permanent, you could use craft glue for a more temporary wrapping!)
3. Place the end of one strip on the glue, wrong side of the fabric against the metal.
4. Begin wrapping the handle, covering up the end of the strip.
5. Continue wrapping. It's a bit tricky at the bottom, requires a little extra tight wrapping!
6. Wrap until the handle is completely covered. I ended my wrapping at the top of the handle, so that the finishing wouldn't get in the way when I use them.
7. Tie your fabric around the handle.*
*You could also finish your handles by simply cutting off the extra fabric and gluing the end down, just like how you started.
8. Knot your fabric tightly, cut off excess fabric and tuck it over a bit. (This part isn't perfect!)
9. Use a little glue to secure knot in place. Repeat with second handle.
Voila! You're done!
Subscribe to:
Posts
(
Atom
)