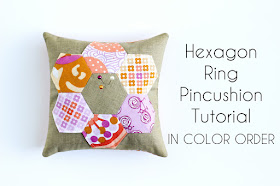
Happy Friday! I love making pincushions, so I thought why not make one with hexagons on it.
This post was originally posted as a part of Festival of Hexagons.
This post was originally posted as a part of Festival of Hexagons.
Sewing Level: Intermediate
Materials:
- (1) 6" and (1) 2.5" squares of background fabric
- (6) 2.5" print squares
- (1) 6" print square
- Coordinating thread
- Marking pen/chalk
- Pincushion filling of choice (I use crushed walnut shells)
Looking for supplies? Check out my Pattern Supplies and Resources post.
Looking for supplies? Check out my Pattern Supplies and Resources post.
1. Using your 2.5" print and background squares, baste seven hexagons. If you've never sewn hexagons before, make sure to check out Christina's tutorial for making, basting, and stitching them, here.
2. Arrange your hexagons into a flower with the background hexagon in the center. Stitch together by hand.
3. Give your flower a quick press, then clip your basting threads and carefully pull out your papers.
4. Take your 6" background square, and mark out a 5 3/8" square in the center with a marking pen or chalk. I love these Clover Chaco Liners.
5. Use your drawn square to center your hexagon flower on the background square.
6. Pin your hexagon flower in place. Top-stitch in place, using a very small seam allowance by machine.
7. Place your 6" print square right sides together with your background square/hexagon flower.
8. Sew using a 1/4" seam allowance around all four sides, leaving a 2" opening on one side.
9. Turn right sides out, careful poking out the corners. Fill with your filling of choice. I like to use crushed walnut shells. This way they can double as pattern weights!
10. Carefully handstitch the opening closed.
Enjoy your new pincushion! :)
Happy Stitching!


You can never have too many pretty pincushions! I love the colours you used in yours :)
ReplyDeleteVery cute pin cushion and a cute hexie project. Thanks for sharing.
ReplyDeleteThis is lovely, a girl can never have too many pincushions.
ReplyDeleteThnx for this tutorial. A great way to get going with Hexy designs,
ReplyDeleteVery cute! Do you know that I have never made a pin cushion?! I think I need to remedy that today!
ReplyDeleteI love this!
ReplyDeleteSo cute ~ I've many a pin cushion and will have to add this to the collection!
ReplyDeleteWhat a great idea and fun tutorial! I am a huge fan of hexies already. Thanks for the great post.
ReplyDeleteVery cute! Love it Jeni.
ReplyDeleteSo adorable!!! Thank you for the tut!
ReplyDeleteSoooo cute! I'm definitely making this, thank you!
ReplyDeleteso cute. Hexagons are just so good in everything.
ReplyDeleteLove this!! Definitely making one of these!!!
ReplyDeleteCute cute! I have a small bin full of hexies just waiting to be used... this would be a great little start! Crushed walnut shells, interesting! I may try sand too.... hmmm
ReplyDeleteCute cute cute!!! You know I love me some hexagon-goodness!
ReplyDeleteThis is a great tutorial. Hexies are a little intimidating but this would be a great starting project with lots of great resources that you've linked up. Thanks!
ReplyDeleteOh I need a new pincushion and this is just the thing! Thanks for the tute!
ReplyDeleteI love your pincushion. A friend of mine made one like it that I loved too so I am glad you showed how to make one.
ReplyDeleteCute Tute!
ReplyDeleteDeborah
homemakerhoney @gmail .com
What a great pin cushion. Love your fabric choices, too. What is it about these hexies that some of us can't get enough of?
ReplyDeletethinkbox1 at aol dot com
I LOVE this - a hexie project that's not too intimidating. Thank you.
ReplyDeleteThanks for the hexagon pin cushion tutoril. I only learnt to paper piece with hexagons last week and made a flower like yours from scraps and was unsure what to do with it. Now I know!
ReplyDeletePretty, pretty! And you used some of your favorite Erin McMorris prints, too!
ReplyDeleteI love this pin cushion. Making a couple for christmas gifts for girlfriends
ReplyDeleteThis looks much easier than the pieced hexagon pincushion I made. Thanks for the ideas!
ReplyDeleteVery nice pincushion. I really do love Hexagons as they were my initial reason for learning to quilt a few years ago. Very pretty Jeni. Thank you.
ReplyDelete