Pages

Saturday, June 30, 2012

La Dee Da Giveaway with The Intrepid Thread!


How about we start this weekend off right, with a giveaway! Julie of The Intrepid Thread knows how much I love Erin McMorris's fabrics, so we thought it would be fun to give away a bit of her new line, La Dee Da!

So, would you like to win a Fat Quarter bundle of the Goldenrod colorway? :)

To enter just leave a comment!

For a second entry, head on over to The Intrepid Thread and let me know what your favorite item is! Come back here and leave a second comment!


My favorite item is the Floradots print in Saffron from La Dee Da (go figure!)! They are a fantastic basic and the color is the perfect mustard gold! I love the vintage, mid-century modern feel of her designs!

All entries are welcome! Giveaway will end Tuesday, July 3rd at 5pm CST. Winner will be chosen by Random.org.

Happy Weekend!

Friday, June 29, 2012

Favorites

Favorites by jenib320
Favorites, a photo by jenib320 on Flickr.
1. Butterflies - done, 2. Scrappy quilt top, 3. Untitled, 4. Off Centered Improv, 5. wildflower garden quilt: block #2, 6. Another WIP, 7. Plum Crazy, 8. Getting there, 9. Passing Showers Quilt

Every Friday I go through my favorite photos on Flickr, and choose nine sewing/quilting related projects to showcase here. These photos and projects are not my own, you can find the original images and creators by clicking the coordinating links! If for any reason you do not want your project featured here, please feel free to email me and I'll remove it! 

Happy Weekend! :)

Thursday, June 28, 2012

Stash Building Refresher + Stash Stack Club!

Today we're going to have a little refresher on one of last year's Art of Choosing posts, building a well-rounded stash.  I've gone more in depth, hit on things that I still get lots of questions about, and took fresh new photos of more current fabrics! Plus I've got a surprise in store for you too!

When you're new to sewing, it can be difficult to know where to start in terms of stashing.  Of course it's often nicer for it to happen organically, but that can take a while.  New and seasoned sewers alike may find they gravitate to certain colors and end up with holes in their range of colors.  Having a well-organized stash can help you identify what colors you're missing or low on and what colors you might have more than enough. I'd recommend perusing the Art of Choosing series, especially the posts on folding and stash organization.

For fabric information on the stack above, click here.

Why Stash?
There is nothing better than having fabrics on hand when you're ready and rearing to start a new project.  This doesn't mean you won't ever need to order anything special, but perhaps not as often! If you plan on creating quilts and projects from multiple fabric collections, it's especially important to have a healthy stash.

Often times you might find yourself drawn to focus prints that have lots of different colors in them, I know I do! These prints are great and can often be a building point for entire projects, but they don't always mix with one another very well.  This is where stash builders come in! Because they generally are a single color, they can easily be mixed together with focus fabrics or other basics!

What to Stash?
Depending on your tastes and what you like to sew, there are loads of different fabrics that you could consider stash builders.  For some it's strictly dots and stripes, while others might consider basic text prints a stash builder.  Regardless of your style, there are some general qualities of a stash fabric that we can pretty much agree upon.  Let's explore them!

Tone-on-Tone Fabrics
Tone-on-Tone fabrics feature different shades of the same color to create a pattern.  They immediately read as a single color, which makes them perfect for stash building and choosing fabric by color.

Nature Elements by Pat Bravo, Outfoxed by Lizzy House, Hope Valley by Denyse Schmidt, Soul Garden by Carolyn Gavin.

Single Color + White/Cream Fabrics
Single Color + White/Cream fabrics feature a single color and the addition of white or cream to create a pattern.  These types of prints can be found in most modern collections and they're really versatile.

Metro Living by Robert Kaufman, Sundae Stripe by Bonnie & Camille, Hoopla by Moda, Wild Thyme by Carolyn Gavin.

Geometric: Check Fabrics
You can't get much more basic than a simple gingham.  If that's not your style, cross hatch and basket weave prints are all over the place now a days, and have a similar look!

Heath by Alexander Henry, Gingham by Michael Miller, Tailor Made by Cosmo Cricket, Dazzle by Melissa Averinos.

Geometric: Dot Fabrics
When you're searching for good stash fabrics, dot fabrics are a perfect choice.  But don't think it's just about a regular old dot.  There are lot of great prints that deviate from the standard dot.  These prints can add a lot of interest to your projects!

A Walk in the Woods by Aneela Hoey, Oval Elements by Pat Bravo, Outfoxed by Lizzy House, Reunion by Sweetwater.

Geometric: Stripe Fabrics
Who doesn't love a good stripe? I'm always grabbing stripe fabrics for binding and other details on my projects.  Traditional stripes are nice, and there are lots of prints out there that have a nice twist!

Handwriting Paper by Timeless Treasures, A Walk in the Woods by Aneela Hoey, Aviary by Joel Dewberry, Authentic by Sweetwater.

Floral Fabrics
Good stash fabrics aren't strictly limited to geometrics! It's nice to have floral stash fabrics too!

Floral Elements by Pat Bravo, Flower Sugar by Leicen, 1001 Peeps by Lizzy House, Farmer's Market by Sandi Henderson.

How much to Stash?
When I'm purchasing stash builders I generally buy fat quarters or 1/2 yards.  Since I don't necessarily have a use in mind for them I hesitate to get more unless it's something I really love.  Lizzy House's and Aneela Hoey's basics definitely fall under that category for me and I'll often pick up a yard of my favorite colors! 


How to Stash?
Well that's a very good question! ;)  I'm pairing up with Brenda of Pink Castle Fabrics to bring you great stash builders! You can peruse her giant section of stash building fabrics that we've selected in addition to a new Stash Stack Club Subscription! Each month will be a different color and we'll work through an entire year of colors! By the end you'll have a stash of basics from red all the way to purple and a dose of neutrals too!
  

We're kicking July off with one of my personal favorites, Pink! :)

Full Stack = 12 prints per month. 

Half Stack = 6 prints per month. 

For more information and sign-ups, head on over to Pink Castle Fabrics

Brenda has some other goodies for you! As a Thank You for being a founding member of our Stash Stack Club use code FOUNDER10 for 10% off your first month! (expires July 10th)

She also has all of her stash builders 15% off this weekend with code STASH15!

Happy Stashing!

Wednesday, June 27, 2012

Pattern Sale!

In Color Order Pattern Sale by jenib320
In Color Order Pattern Sale, a photo by jenib320 on Flickr.
Happy Wednesday! I figured it was high time I had a pattern sale! You can find both my Lined Drawstring Bag Pattern and Vintage Nine-Patch Quilt Pattern on sale in my Meylah shop! The best part about Meylah is you don't have to wait for me to email you your patterns! You can download them right away and get sewing!


Sale will run through Saturday, June 30th! Cheers! :)

Tuesday, June 26, 2012

Pattern Review: State Street Tote

Rhapsodia State Street Tote by jenib320
Rhapsodia State Street Tote, a photo by jenib320 on Flickr.
Today I'm happy to be reviewing the State Street Tote by Bari J over on Sew Sweetness as a part of Purse Palooza! As I mentioned on Sunday, I used prints from the Sweet Journey colorway of Rhapsodia by Art Gallery Fabrics! You can find my experiences with this pattern and lots more photos in the post here!

You can purchase the State Street Tote pattern in Bari J's shop here.  You can find Rhapsodia by Art Gallery Fabrics at Fat Quarter Shop and The Intrepid Thread.

Happy Sewing!

Monday, June 25, 2012

Giveaway Winners!

Happy Monday! It's time to announce the winners of the last two giveaways!

Patchwork Bunting Tutorial by jenib320
Patchwork Bunting Tutorial, a photo by jenib320 on Flickr.
First, the winner of this lovely 7 fat quarter bundle of Sugar by Pat Bravo is...Jenelle!


Next, the winner of the half-yard bundle from JAQS Fabrics is...Lisa Marie!

Thanks to everyone who entered! Ladies, I'll be in touch with you today via email! :)

Sunday, June 24, 2012

This Weekend

Rhapsodia State Street Tote by jenib320
Rhapsodia State Street Tote, a photo by jenib320 on Flickr.
Hope everyone has had an enjoyable weekend! Ours was pretty low-key, but I did manage to get a few things done!

I made myself a new bag a few weeks ago, but only just now got photos ready and uploaded! It's the State Street Tote pattern by Bari J, using Rhapsodia by Art Gallery Fabrics. I am so happy with how it turned out! On Tuesday I'll be sharing lots more about this bag when I review the pattern as a part of Purse Palooza!

You can find the State Street Tote pattern in Bari J's shop here .  You can find Rhapsodia at Fat Quarter Shop and The Intrepid Thread.

Appliance Cozy by jenib320
Appliance Cozy, a photo by jenib320 on Flickr.
I finished up my first project using Cherry Christmas by Aneela Hoey! I decided my kitchen could use some cheerful holiday decorations, so I'll be crafting up a few this summer! This first one is a quilted appliance cozy! It was supposed to be just to cover my Kitchenaid mixer, but *ahem* someone over-estimated the size it needed to be (me!).  So! It fits my mixer and my blender, haha! Next I'm going to spruce up some plain tea towels and make some potholders!

Pincushion Jar by jenib320
Pincushion Jar, a photo by jenib320 on Flickr.
After I made the frog pincushion earlier in the week, I was feeling the need to make another.  I found a few unused jars in the pantry yesterday so I turned one into a pincushion! I used this tutorial and a charm square of Domestic Bliss by Liz Scott.

Patched by jenib320
Patched, a photo by jenib320 on Flickr.
I was so sad last summer when my favorite pair of capris got a huge hole in the knee.  I had thrifted these jeans for $3 a few years ago and they are so comfortable.  I tucked them in the corner, just couldn't bear to toss them! Today I finally pulled them out and patched them! I used a scrap of Neptune by Tula Pink and free motion quilted it over the hole (after stitching the hole up).  These jeans have a pretty loose fit, so I was able to get the leg onto the free arm of my machine.  Why did I wait so long to fix them?

New Project by jenib320
New Project, a photo by jenib320 on Flickr.
Last night I started a new quilt project using my Blogger's Choice Bundle from Fat Quarter Shop! I am using Half-Rectangle Triangles, which I've never sewn before! So far they are fun! The top is coming along quickly, so hopefully I'll be sharing more soon!  Rumor has it I might have a bundle to give away here too! ;)

 I am using this half-rectangle triangle tutorial.

Keane by jenib320
Keane, a photo by jenib320 on Flickr.
Last night we drove out to Milwaukee to see my all-time-favorite band, Keane! This is the 4th time I've seen them, and the show was so amazing! They never disappoint!  For a little blast from the past, here are some photos of me hugging the members of Keane back in 2005! One of my favorite memories!

Garden Growth by jenib320
Garden Growth, a photo by jenib320 on Flickr.
Thought it was time for another garden update! My tomatoes have EXPLODED! Look how big they are! You can't even see the cages anymore! I've started harvesting basil, cilantro and lettuce (mostly for George bun!), and I've got tiny baby tomatoes and a baby pepper now too! I'm having such a blast!

George by jenib320
George, a photo by jenib320 on Flickr.
George :)

Today I love the..
Smell of: Fried chicken
Sound of: Keane!!
Taste of: Red raspberries
Sight of: Neighbor kitty enjoying the sun
Feel of: Relaxing day at home

Good Things about Today:
- Good lighting for pictures!
- Relaxed today!
- Arrested Development!
- Got a few things done!

Friday, June 22, 2012

Lined Drawstring Bag Pocket Tutorial

Terri was kind enough to review my Lined Drawstring Bag Tutorial as a part of Purse Palooza! Isn't her version (above) so cute? I love her fabric choices. Check it out her review here!

She wrote up an add-on tutorial for how to add pockets to the outside of the bag, and you can find the tutorial here. You'll need to follow instructions from the original lined drawstring bag tutorial to finish the bag.

Lined Drawstring Bag Pocket Tutorial - In Color Order
I had to try it out myself, it's really fun. Plus, it's an opportunity to bring in another fabric print! :)

Happy Sewing!

Favorites

Favorites by jenib320
Favorites, a photo by jenib320 on Flickr.
1. Not perfect but I love it! Thanks Lynne!! Great pattern!! @lilysquilts, 2. OwlAndPussyCatQuiltFront1, 3. FO: Improv quilt, 4. Rainbow Stars pillow, 5. Scraparadise, 6. Summer Wedding, 7. cacophony, 8. Spool Pillow Top, 9. Liz's quilt

Every Friday I go through my favorite photos on Flickr, and choose nine sewing/quilting related projects to showcase here. These photos and projects are not my own, you can find the original images and creators by clicking the coordinating links! If for any reason you do not want your project featured here, please feel free to email me and I'll remove it!

Happy Weekend! :)

Wednesday, June 20, 2012

This Week

Drawstring Bag + Pockets by jenib320
Drawstring Bag + Pockets, a photo by jenib320 on Flickr.
Happy Summer! I have so much to show you this week! It's been busy over here behind the scenes, despite the crazy heat we've had in Madison.  We've been sticking inside where it's cool!

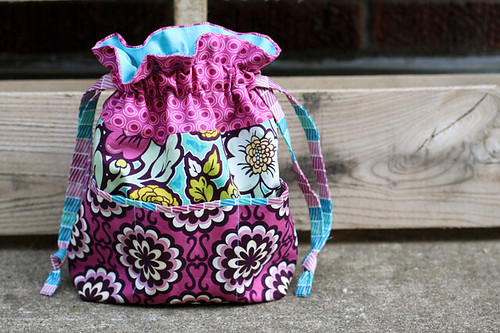
This afternoon I whipped up a lined drawstring bag with a twist! Terri of Sew Fantastic came up with this super fun add on to my tutorial, outside pockets! I just had to make one! She has a tutorial for adding them here!  I used prints from Bespoken by Art Gallery Fabrics along with Oval and Pure Elements also by AGF!

Original size tutorial can be found here, custom/other sizes pattern can be found here, pocket tutorial can be found here.

Bloom Progress by jenib320
Bloom Progress, a photo by jenib320 on Flickr.
I've made some progress on my Bloom quilt this week! Two largest rounds are sewn down! I'm using a light gray Bella solid (I can't remember the color, bought it at my LQS, apologies!) for the background.  I'm absolutely loving it so far! Hope to finish the top this week!

Bloom pattern by Aneela Hoey!

Pincushion by jenib320
Pincushion, a photo by jenib320 on Flickr.
Dug into my scrap bin for two projects this week.  The first is another addition to my pincushion collection! I spotted this ceramic frog candle holder at the Bath and Body Works sale early this week and knew it would be perfect for a pincushion! A handful of fiberfill and a small circle of fabric and voila! The scrap is Poetica by Art Gallery Fabrics.

Lanyard by jenib320
Lanyard, a photo by jenib320 on Flickr.
My second scrappy project for the week was a new key lanyard.  My old one was really worn and dirty, I've been meaning to replace it for a while.  I used scraps from my Patchwork Bunting and my favorite interfacing, fusible fleece (Pellon 987F).  A few simple quilting lines give it extra sturdiness. Fabrics are Sugar by Pat Bravo.

I got some very exciting mail today! A few months back Kimberly of Fat Quarter Shop asked me to put together one of their Blogger's Choice Bundles! Of course I said yes! The time has come, my bundle is here! I'll be chatting about it over on their blog next month! In the meantime I'm trying to decide what to make with it!  I choose prints from Lillybelle by BariJ, La Dee Da by Erin McMorris, Grand Hotel by Jenean Morrison, and Oval/Pure Elements by Art Gallery Fabrics. Can you tell my Art Gallery obsession has reached an all-time high? :)

You can find my bundle for sale here!

In other fabric news, look what arrived on my doorstep last week!? Some Cherry Christmas by Aneela Hoey! I've got a fun project in the works for this beauties, I hope to share next week! Cherry Christmas ships in July! Watch for it, it's beyond cute!

George by jenib320
George, a photo by jenib320 on Flickr.
George bun!

Today I love the..
Smell of: Vanilla lip balm
Sound of: George running around!
Taste of: PB+J
Sight of: Rain in the forecast
Feel of: Cool Air

Good Things about Today:
- Productive day!
- George's check up went great, perfectly healthy!
- Happy mail!
- This post has no phone photos, yay! :)

Monday, June 18, 2012

Patchwork Bunting Tutorial

Patchwork Bunting Tutorial - In Color Order
Patchwork Bunting Tutorial, a photo by jenib320 on Flickr.
Today I have a fun summery tutorial for you! I'm showing you how to create this patchwork bunting! Who said bunting is just for celebrations?  Everyday is a celebration, so use this bunting anywhere you want to add a little sunshine!

This was originally published as a guest tutorial on the Art Gallery Fabrics Blog. 

Patchwork Bunting Tutorial - In Color Order
Patchwork Bunting Tutorial, a photo by jenib320 on Flickr.
I choose prints from the Creamy Gelato color way of Sugar by Pat Bravo for this project. The colors and prints just scream summer to me!

Patchwork Bunting Tutorial - In Color Order
Patchwork Bunting Tutorial, a photo by Jeni Baker on Flickr.
Sewing Level: Beginner Friendly


Materials:
- 7 print fat quarters
- 1/4 yard of solid fabric
- Coordinating thread

Finished Size: Approx 80" long from tip to tip
Seam Allowance: 1/4" unless otherwise noted

Cutting:
From each print fat quarter:
- Cut (1) 4.5"x18" strip
- Subcut strip into (2) 4.5”x6.5” rectangles

- Cut (2) 2.5"x18" strips
- Subcut each strip into (6) 2.5"x2.5" squares

From solid fabric:
- Cut (2) 2”xWOF strips
- Trim both strips to 42" long

Instructions:
Patchwork Bunting Tutorial - In Color Order
Patchwork Bunting Tutorial, a photo by Jeni Baker on Flickr.
1. Choose six 2.5” squares and arrange them in three rows of two squares each.

Patchwork Bunting Tutorial - In Color Order
Patchwork Bunting Tutorial, a photo by Jeni Baker on Flickr.
2. Sew the squares in each row together. Press seams open.

Patchwork Bunting Tutorial - In Color Order
Patchwork Bunting Tutorial, a photo by Jeni Baker on Flickr.
3. Sew rows together. Press seams open.

Patchwork Bunting Tutorial - In Color Order
Patchwork Bunting Tutorial, a photo by Jeni Baker on Flickr.
4. Choose a 4.5”x6.5” print rectangle. Place right sides together with your patchwork.

Patchwork Bunting Tutorial - In Color Order
Patchwork Bunting Tutorial, a photo by Jeni Baker on Flickr.
4. Sew around three sides, leaving one short side open. Backstitch at start and finish.

Patchwork Bunting Tutorial - In Color Order
Patchwork Bunting Tutorial, a photo by Jeni Baker on Flickr.
5. Clip the corners, turn carefully. Press.

Repeat steps 1-5 with remaining squares and rectangles until you have 14 bunting flags.

Patchwork Bunting Tutorial - In Color Order
Patchwork Bunting Tutorial, a photo by Jeni Baker on Flickr.
6. Take solid strips and sew together along the short sides to create one long strip. Press seam open.

Fold down 1/4” (or so, doesn’t need to be exact!) on each short edge. Press. Topstitch.

Patchwork Bunting Tutorial - In Color Order
Patchwork Bunting Tutorial, a photo by Jeni Baker on Flickr.
7. Take your strip and fold in half lengthwise, press.

Patchwork Bunting Tutorial - In Color Order
Patchwork Bunting Tutorial, a photo by Jeni Baker on Flickr.
8. Unfold, and fold each raw edge into the center line you just created. Press.

Patchwork Bunting Tutorial - In Color Order
Patchwork Bunting Tutorial, a photo by Jeni Baker on Flickr.
9. Fold in half again and press.

Patchwork Bunting Tutorial - In Color Order
Patchwork Bunting Tutorial, a photo by Jeni Baker on Flickr.
10. Starting from the center of the strip, begin nestling the unfinished edge of each flag into the fold of your strip. Place first two flags on either side of the center seam, approx. 1/8” apart, pin.

Patchwork Bunting Tutorial - In Color Order
Patchwork Bunting Tutorial, a photo by Jeni Baker on Flickr.
11. You may choose to alternate patchwork and plain sides like I did, or do all patchwork on one side and all plain on the other! Continue placing flags until all 14 flags are set.

Patchwork Bunting Tutorial - In Color Order
Patchwork Bunting Tutorial, a photo by Jeni Baker on Flickr.
Patchwork Bunting Tutorial - In Color Order
Patchwork Bunting Tutorial, a photo by Jeni Baker on Flickr.
12. Starting at one end of the strip, begin stitching it closed with an 1/8” seam allowance.

Continue stitching across the strip, securing all the flats, until you’ve reached the other end and the strip is closed.

Patchwork Bunting Tutorial - In Color Order
Patchwork Bunting Tutorial, a photo by Jeni Baker on Flickr.
Voila! You’re done! Enjoy your fun summer bunting! :)

Patchwork Bunting Tutorial - In Color Order
Patchwork Bunting Tutorial, a photo by jenib320 on Flickr.
If you make one, I hope you'll add a photo to the In Color Order Flickr Group!

Happy Sewing!