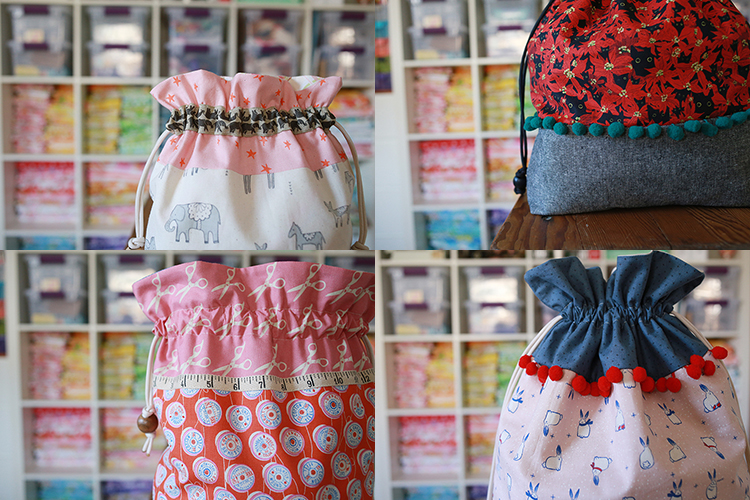
Get your sewing machine ready! It's that time of year, our annual Lined Drawstring Bag Sew Along is almost here! Using drawstring bags to wrap your holiday gifts is a great way to reduce the amount of single-use wrapping paper you need. Every year is an opportunity to build up your stash of bags and use up some of the beautiful fabrics you probably have kicking around your fabric stash!
A handmade gift bag can really take a gift to the next level, especially when it's tailored to the recipient or gift. Within our immediate family, we keep reusing the same bags year after year. I love pulling my older bags out and adding new ones to the mix. I hope you'll sew along with me and make a few bags this year!
When:
The Lined Drawstring Bag Sew Along will officially kick off on Wednesday, November 20th and will run for four weeks!
Where:
Each week of the sew along I'll publish a blog post with a new tutorial. There is a dedicated sew along page, which I'll update as we go along. It's a great place to find all the posts from previous year's sew alongs, there is so much good information and inspiration there, so be sure to check it out.
How to Participate:
Just like in years past, this sew along is going to be casual and no-stress. Participating is easy, we'll be using the #lineddrawstringbag hashtag on Instagram to share our progress. Please tag me @jenib320 too, I love sharing your projects throughout the sew along! Not on Instagram? That's okay! Please join in the sew along and if you'd like, share your bags with me via email! (jenib320 at gmail.com)
Patterns & Tutorial:
Sew from the free tutorial, the pattern or the expansion pattern! Both patterns are 20% off today through 11/15/24. Prices are already marked down.
Shop Patterns:
Lined Drawstring Bag Pattern
Lined Drawstring Bag Expansion Pattern
Shop Notions:
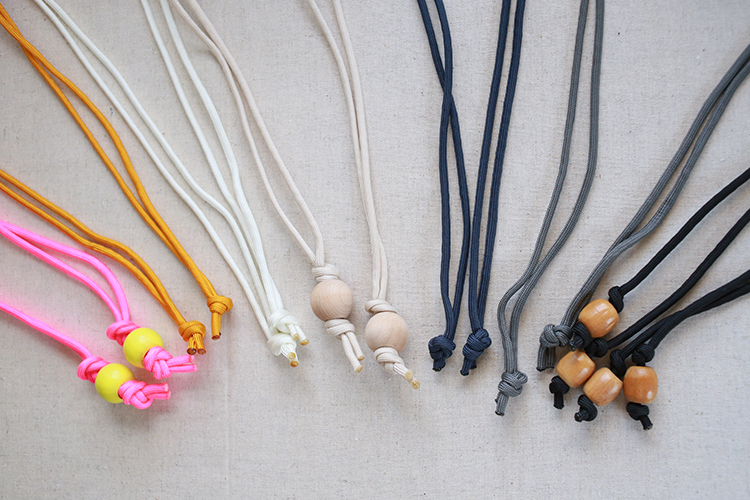
Don't forget to pick up some supplies while you're at it! The shop is stocked with lots of different cotton twill tape options, nylon paracord and wooden beads. I also put together a new Lined Drawstring Bag Notions Kit, to make it super easy to pick up a few supplies!
Lined Drawstring Bag Notions Kit
Cotton Twill Tape
Nylon Paracord
Round Wooden Beads
Beehive Wooden Beads
I also have a new color of Nylon Paracord in the shop, black!
Thank you for your continued support. Can't wait to sew bags together!
Happy Sewing!
Announcing the 2024 Lined Drawstring Bag Sew Along!
Friday, November 1, 2024
Tuesday, October 29, 2024
Happy Tuesday! Today I have a fun parade of drawstring bags to share! I'm celebrating five years since I released my Lined Drawstring Bag Expansion Pattern! To mark this milestone, I decided to challenge myself to remake all the bag variations included in the pattern.
I've been working a lot with vintage sheet fabrics lately, so I also challenged myself to use only my quilting cotton and canvas stashes. I wanted to especially focus on using up leftovers and precious saved fabrics. It's nice to have some constraints sometimes, rather than having endless options!
There are 10 main variations included in the pattern, plus techniques and ideas for taking each variation a step further. I made one variation twice, so I ended up making a total of 11 bags over the course of this month. Without further ado, let me show you the bags I made!
Find the pattern in my shop here: Lined Drawstring Bag Expansion Pattern.
First up we have the Peek-a-boo bag! This is one of the simpler variations, but it's really cute. I love having the lining fabric peek through at the top of the bag. These prints have been in my stash for many years, I was happy to finally use that floral print in a project! This is a Project size bag. I used antique ruler twill tape to finish it.
The Mini Accent bag is next! This variation plays with the proportion of the accent and the exterior main. I used an old Heather Ross linen, I've had it so long I don't even remember what collection it's from. I haven't used that purple lining print in probably 10 years, still such a good one! This is an Everything size bag. It's finished with 1/2" natural twill tape.
On to the Bottom Accent bag! Of all the variations in the pattern, I've probably made this one the most. Instead of having the accent at the top of the bag, it's at the bottom! I love this sheep print by Ellen Luckett Baker so much! I made a bag (Sheep Maker's Tote) with the mustard colorway back in 2016. This is a Project size bag. Finished with nylon paracord.
Next up, two Patchwork bags! I had two stacks of 2.5" squares that have been kicking around my stash for a while and I decided to use them both up during this challenge. For this one I used all strawberry prints! My friend Jacey gave me a mini charm pack of strawberry prints years ago and I'm so glad I finally used them in a project. I love strawberries so much! The accent on this bag is a thrifted quilting cotton. This is an Everything bag. I finished it with nylon paracord and beehive wooden beads.
For my second Patchwork bag, I used the leftovers of a couple different Carolyn Friedlander mini charm packs. I made another patchwork bag with her fabrics a few years ago, which you can see here: February Monthly Report. This one features a lot of wovens that coordinate with her collections. I used a bright green solid leftover from my Large Keep Turning Quilt. This is an Everything size bag, and I finished it with black ruler twill tape.
Next up, a Foundation Pieced bag! I dug into my low volume scraps for this bag, in particular my cream based fabrics. The exterior main pieces have a muslin foundation, and the possibilities in terms of design are endless! I've made a bunch of string block bags using this same technique. For this bag I did logcabin-ish piecing. This is an Everything size bag, and I pulled out my hot pink nylon paracord to finish it!
The patchwork bags are fun, but can be a bit time consuming. Enter the Easy Going bag! This bag uses only two fabrics, one for the exterior and one for the interior. I've had this purple Alice in Wonderland fabric from Kokka for ages. I'm happy that I finally used it! This is a Project size bag, and I finished it with 1/2" natural twill tape and 1" wooden beads.
This bag is even easier! This is the single fabric Easy Going Bag. You only use one fabric for the entire bag. I choose this funky stripe from a friend. This is a Snack size bag and I finished it with some yellow measuring tape twill!
This variation is super fun (in my opinion!) the Backpack bag! Turning your drawstring bag into a drawstring backpack requires only a few minor alterations. I made it using Halloween fabrics because I think it would be an excellent bag for trick-or-treat. As your bag of candy gets heavier, you get to wear it on your back instead of carrying it! This is an Artist size bag, and it's finished with black nylon paracord.
Another Halloween themed bag, this time a Quilt Block bag. I love adding quilt blocks to the exterior main on drawstring bags. I've released a new block bag (almost) every year during the lined drawstring bag sew along (this year's is going to be so cute!!). The pattern includes instructions for adding common square quilt blocks to your bags as well as instructions for adding a custom sized block to the bag front. For this bag I used a leftover spooky block. This block is a free pattern, you can find it here: Paper Pieced Coffin Quilt Block. This is a Project size bag, and I finished it with black twill tape.
Last but not least, a bag with a Centered Design! There are instructions for laying out an embroidery or appliqué design on the exterior of a bag, as well as centering an existing design. For this bag, I centered a leftover screen print that I had in my stash. I had printed it on white fabric with white ink, so I dyed it before turning it into the bag! The back of the bag is a piece of fabric that I ice dyed.I'm thinking about printing panels of this print (and the sewing version) again, maybe this Spring? We'll see! This is an Artist size bag and I finished it with black ruler twill tape.
That's a wrap! I'll be back to announce the dates for this year's sew along later this week!
Patterns: Lined Drawstring Bag Pattern, Lined Drawstring Bag Expansion Pattern
Fabrics: Stash
Notions: Cotton Twill Tape, Nylon Paracord, Round Wooden Beads, Beehive Wooden Beads
Happy Sewing!
Friday, October 18, 2024
Happy Friday! Today I want to share a recent crafting project that I finished, a small wreath made from dried strawflowers!
One of the hobbies that my grandmother enjoyed was making dried flower arrangement. She bought a lot of the dried flowers that she used (I remember going to a craft fair with her at a school to buy some!), but she liked to grow her own strawflowers. She had a great garden, and the strawflowers fascinated me. Right on the plant, they are dry and crunchy like straw. So different to most flowers!
I started growing strawflowers in my own garden five years ago. I go about this two ways. I nearly always buy a pot or two of short strawflowers from a local nursery to grow on the driveway in a pot. The bulk of what I grow I start from seed. Strawflowers need a long time to get going, so I start my seeds in very early March. They are a time investment for sure!
This has been one of my best years for strawflowers! I have a couple plants that are easily 8 feet, which is so cool. I harvest flowers a couple times a week. It can be a challenge to figure out the right time to cut them, since they continue to open after they are cut. I cut mine while they're still mostly closed. This shoe box sized tub is flowers I harvest just this season!! The seeds I grew this year came from Select Seeds and Johnny's Seeds.
I like to use simple grapevine wreath forms from the craft store. A straw form might be easier now that I think about it, maybe I'll try one of those next! This wreath is around 6".
I like to used hot glue to affix my flowers to my form. I'm using a battery operated hot glue gun (which I LOVE), but it is a little overkill for this project in terms of heat.
I started by adding flowers to the front of the wreath, and then slowly building up the sides.
It's so fun digging through all the flowers and finding just the right size/color for the spot I'm filling. I found these two while making this wreath and they might be my favorites. The colors are just so good!
All done! I don't know how many flowers I ended up using to finish this, but it did take me a few days. I am so happy with how it turned out. I've made a few of these wreaths and I can confidently say this is my best one! I bought some tiny wreath forms a few years ago, I'm excited to cover those too!
Here is a view from the side, it looks like it's encrusted with flowers. :)
Strawflowers are one of my very favorite flowers to grow and they're so fun to craft with. I highly recommend trying them out in your garden next year! Even if it's just a pot from your local nursery!
Happy Crafting!
Friday, October 11, 2024
Happy Friday! Today I want to share a few recent pillow covers that I made using my vintage sheet stash!
Lately I've had good luck finding nice feather pillow forms at the Goodwill Outlet. Since they can't be washed, I seal them in big black trash bags and let them sit in the summer heat in our garage for a month or so before running them through the "sanitize" setting on our dryer. Once this group were ready to come into the house, I set about making covers for them! I had two 20" forms and one 24".
For the first 20" pillow form, I decided to make a pillow using the Woven Quilt pattern, which can be found in my book, Patchwork Essentials: The Half-Square Triangle. This one is made completely from scraps! Honestly, I'd love to make an entire quilt like this!! I really love how it turned out, so scrappy and happy. I used the wide hem of a sheet for the back, which worked pretty well! It gapes a little bit, could probably have made the two halves overlap more, but that's okay. It still works!
For the 24" pillow form I really wanted to use the pillow cover I made when I released my Giant Vintage Star Quilt Pattern. Unfortunately, at the time I could not find it anywhere (I've since found it, yay!). So I decided to make another one! I had just thrifted the background sheet, which is what I used as the starting point for this pillow. For this one I put in a simple zippered backing.
Last but not least, this pillow cover was a fun experiement. I wanted to make something that used up some more of the wide sheet hems. I put a foundation for the front and then sewed the sheet hems onto it, overlapping them to hide the raw edges. The result is pretty different from what I normally make, but I like it all the same! And I used up a couple hems, so win-win!!
Baby girl is climbing all over everything right now, so it's nice to have a few more pillows to add to the mix. Our couch is constantly surrounded by pillows since her preferred way to get off of it is headfirst! Haha. Also, I just love making pillow covers. They're not too time consuming, you can experiement, and they really liven things up in my opinion! These were a lot of fun to make.
Happy Sewing!
Subscribe to:
Posts
(
Atom
)